
Would you like to make your lawn look more healthy and more vibrant? If you are reading this article, it is likely that you already provide the grass with all the water, nutrients, and mowing it could possibly need. But there is one more thing you can do to get the best lawn in the neighborhood, Verticutting.
Verticutting is a revolutionary landscaping technique that makes your grass grow taller, retain moisture and absorb more nutrients. As you can imagine, this results in a better looking, luscious, damage-resistant lawn. This tutorial is a one-stop shop for how and why to verticut your grass like a professional.
What is Verticutting?
In essence, Verticutting is the process of removing the thatch buildup that is on the lawn, allowing the turf to breathe better. It allows the grass to absorb nutrients and moisture more efficiently. It does this by ensuring that all the moisture is absorbed by the fresh, young blades of grass instead of the thatch.
In case you don’t already know, thatch is a combination of dead stems and roots that forms between the blades of healthy, young grass. Now, a certain amount of thatch is not only harmless but even necessary for a healthy lawn.
It provides cushioning and reduces compression in high-traffic areas. However, too much thatch can become a big problem for your lawn as it absorbs the air, water, and food that should be going to the younger turf.
As if that wasn’t bad enough already, thatch also allows insects and disease to reproduce and fester with ease, effectively creating a direct threat to the good health of your lawn grass. Luckily, Verticutting is a technique that is capable of quickly and effectively getting rid of excess thatch without damaging the turf.
How Does Verticutting Work?
Verticutting is not the only technique that can remove thatch from your lawn. By far, the simplest is to use a rake. However, this method is incredibly labor-intensive, slow and impractical, especially for those with large lawns. Another option is to use a dethatcher. However, dethatchers will often damage turf of different varieties.
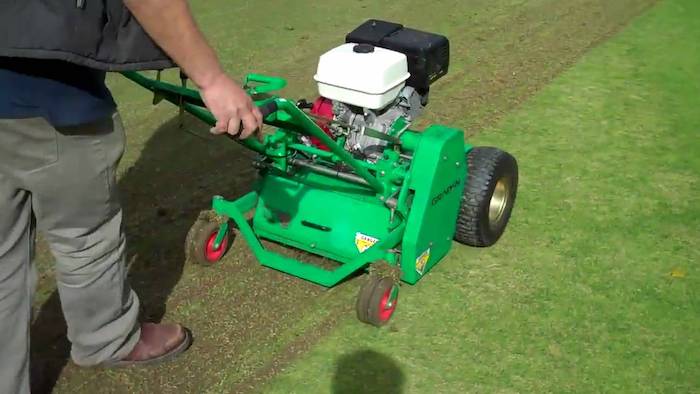
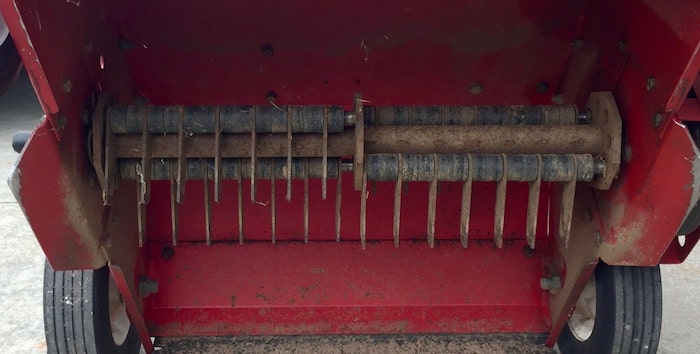
Without a doubt, the best way to remove thatch from your lawn grass is to use a Verticutter. A Verticutter is a special landscaping tool that features special vertically-oriented blades capable of cutting into the thatch without damaging any healthy blades of grass. By cutting into it, the Verticutter can break up the layer of thatch, bringing it to the surface where it will be easy to collect and remove.
Verticutting can be used in combination with other techniques such as aerating and dethatching to achieve an even better final product. And it is the perfect technique to prepare your lawn for overseeding.
Verticutting vs. Dethatching
When it comes to Verticutting and dethatching, there are some clear differences between the two. Dethatching can be done using a rake or a machine, and it requires a great deal of physical exertion. It is not as precise as Verticutting, and it can easily damage healthy blades of grass as it removes thatch.
Meanwhile, Verticutting is a much more accurate and benign process. It is capable of quickly and easily breaking up thatch, bringing it to the top where it can be easily collected and removed. This technique causes little to no damage to the healthy blades of grass that make up the turf.
Verticutting vs. Aerating
Regarding Verticutting vs. aerating, the differences are not as marked as those that come up when comparing Verticutting and dethatching. However, there is one clear distinction to be made between the two techniques.
While Verticutting focuses on removing thatch alone, aerating also removes grass (to give the remaining blades of grass more breathing space). By doing this, you will help the roots of the grass grow freely, eventually resulting in a more established and stable turf. A combination of both techniques should be used to achieve the best results possible.
How Can Your Lawn Benefit From Verticutting?
Verticutting is a very beneficial technique for maintaining and improving the overall health of your grass. In addition to removing thatch, it also:
• Provides grass roots with better access to oxygen, water, and nutrients.
• Helps conserve water by ensuring that moisture reaches the roots efficiently.
• Helps prepare turf for overseeding.
• Helps to improve the overall health and strength of your lawn grass.
How to Verticut Your Lawn Grass
In an ideal scenario, you would hire professionals to Verticut your lawn. However, with the right equipment, it is possible to do yourself. Before attempting to Verticut remember that achieving professional results requires practice and patience.
What You Will Need:
To Verticut your lawn, you will need the following items:
• A Verticutter.
• A working lawn mower.
• A rake.
• Tarp.
• Lawn and leaf bags.
• Some flour.
• Lawn fertilizer.
• A sprinkler.
Step by Step Guide for Verticutting Your Lawn Grass
Once you have gathered all the items necessary for Verticutting your lawn, you are ready to begin the process:
1. Water the lawn
If you water your lawn two or three days before Verticutting, the damp soil will make the process easier. You can also wait for light rain and Verticut the lawn a couple of days after. This rule also applies for when you want to dethatch your lawn.
2. Mow your lawn
Before Verticutting, you will have to prepare the lawn by cutting your grass. Be sure to set your mower to the lowest setting for the type of grass you will be cutting. Use a bagger or container attachment on your mower to collect all the grass clippings. If you don’t have a bagger, rake the grass clippings. You want to ensure that your lawn is free from as many clippings as possible.
3. Mark all obstacles
When you are using a Verticutter, you should always prevent it from damaging objects that may be laying on the ground and buried in the grass. To do this, inspect the entire lawn, picking up any objects that may act as obstacles for the Verticutter. After that, use baking flour to mark all the objects that you can’t pick up and may constitute an obstruction for the Verticutter, including water and gas pipes, sprinkler lines, sprinkler heads, and utility cables.
4. Set the Verticutter
At this point, you should be ready to start the process of Verticutting your turf. To do this, first, set its blades to a high setting. If the grass that makes up your lawn is not particularly thick, set the blades about three inches apart from each other.
If, on the contrary, your grass is of a thick variety (such as Zoysia and Bermuda), set the blades on a low setting, about one inch apart from each other. Take into account that for inexperienced Verticutters this may be a trial-and-error type of process.
5. Apply the Verticutter
Finally, you are ready to use the Verticutter on your lawn. First, start its motor by pushing the on/off button. Then, being guiding it as you would regularly do with an automated push mower.
Typically, Verticutters move forward automatically when activated, eliminating the need for pushing. Instead, you will only have to steer the machine across the lawn. For better results, start in one corner and move in a straight line to the next corner.
Then, turn the machine around, move it a few inches to the side and guide it across in a straight line, making another strip. Repeat this process until you complete the entire lawn. Make sure that you cut the grass in straight lines and that you don’t miss any section of grass.
6. Complete the strips
After you have completed a first pass of the entire lawn, you will need to go over its entire surface one more time. However, this time you will have to make strips on an adjacent side, moving back and forth until you complete the whole lawn. The rule goes as follows: If your first strip goes from south to north, the next one should go from east to west, and so on.
7. Rake the lawn
After you have finished using the Verticutter, it is time to clear out the rests of thatch from the lawn. The thatch will have been pulled to the surface and is easy to pick up and throw away. The easiest way to do so is to use a rake, pushing the debris onto a tarp. Once it is all on the tarp, you can collect it into garbage bags for easy disposal. Alternatively, you can use a leaf blower to move the thatch debris to a clear area.
8. Fertilize the lawn
Once you have gotten rid of excess thatch, your lawn is ready to be fertilized. Be sure to use a lawn fertilizer that works well for the type of grass making up your lawn. Be sure not to use a weed-and-feed type of fertilizing product. Instead, use a product that was specially formulated for working on lawns. By feeding it right after the Verticutting and dethatching processes, you can be sure that your turf will absorb all of the nutrients and beneficial substances that the fertilizer has to offer.
9. Water the lawn once again
After preparing, Verticutting, and fertilizing your grass, you are very close to finishing the entire process. To jumpstart the process of recovery and growth in the turf, you need to water grass thoroughly and with abundant water.
Quick Tips for Verticutting Your Lawn Grass
• Remember to use flour to mark items such as pipes, lines, sprinkler heads, and utility cables.
• To determine whether it’s time to Verticut, reach into the lawn and get a feel of the state of the thatch. If it is half an inch thick or thicker, your turf could use a good Verticutting session.
• If at all possible, do not fertilize your lawn for 45 days before Verticutting. The reason for this is that fertilizer will add to the thatch, increasing its volume and making it harder for the Verticutter to do its job.
• The best time of the year to Verticut your lawn is during fall. If you apply the technique during this season, by the time spring arrives, your grass will be healthier and stronger than ever.
Summary
Verticutting helps you get rid of thatch, insects, diseases, and debris without damaging the healthy blades of grass that make up your turf. By following the above processes with regularity, your lawn will become more robust, stronger and lush. If you have little or no experience with this type of technique, you can always contact a professional in lawn care to do it for you.