Want to harvest rainwater but don’t know where to start? You’ve come to the right place. This practical guide on how to install a rain barrel will walk you through the steps needed to connect your new rain barrel to your gutter downspout. You’ll also learn tips on maintaining your rain barrel and responsibly using the water you collect.
What is a rain barrel?
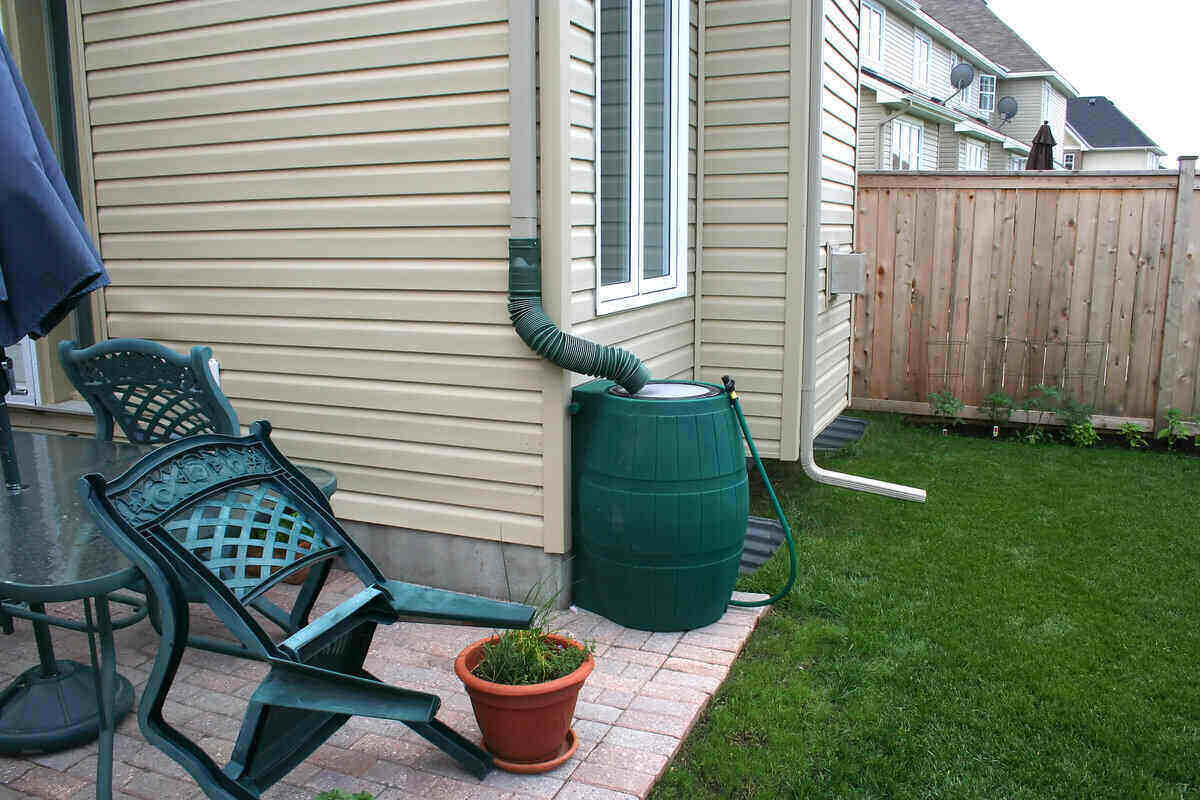
A rain barrel is a vessel used to collect and store rainwater. It comes in many different styles, sizes, and installation variations you can tailor according to your needs. The device connects to your downspout via a hose connector, providing access to water for your lawn and landscaping.

Some benefits of using a rain barrel include:
- Keeping water away from your home’s foundation and basement
- Chemical-free water for your plants and turf
- Water conservation
- Reduced water bill
How to install a rain barrel
Whether you build your own DIY rain barrel or buy it from your local garden center or hardware store — you can install it underneath your downspout to collect rainwater.
Tools you’ll need for a rain barrel installation:
- Hacksaw
- Rain diverter or downspout flex-elbow
- Hose connector or spigot
- 2 to 4 cinder blocks, store-bought rain barrel platform, or 2 to 3 inches of gravel or sand
- Eye protection
- Heavy-duty gloves
It’s also important to gear up and wear protective clothing and accessories to avoid injuries.
Note: Before you start, check your state’s rainwater harvesting regulations. While it’s legal in some form in all 50 states, some states limit how much water you can collect and what you can use it for. Certain local governing bodies (cities, towns, homeowners associations, etc.) ban rainwater harvesting altogether, so check local laws, too.

Step 1: Choose the perfect spot for your rain barrel
Your rain barrel system should go right beneath one of your gutter system’s downspouts. Another requirement is flat, even ground. The bottom of the barrel must be level so it won’t tip over.
If you plan to irrigate your lawn or garden with the water from your rain barrel, choose the downspout closest to the area that needs water. Because rain barrels don’t have much water pressure, the water may not be able to travel very far.
Step 2: Lay the foundation
Once you’ve figured out where to put your rain barrel, you have two options for preparing the site:
- Elevated platform: Elevating your rain barrel a few inches off the ground will increase the natural water pressure and flow rate. Use a platform that can hold the barrel’s weight when it’s full of water – around 300 pounds. You can purchase a plastic rain barrel stand or use 2 to 4 concrete cinder blocks (depending on the size of the barrel).
- Gravel or sand pit: In lieu of a platform, dig a pit 2 to 3 inches deep. Fill the pit with gravel or sand and smooth the top to create a flat, level surface on which to place the barrel.
Pro tip: If you want to use your rain barrel to power a soaker hose or drip irrigation system, installing it on a platform for the increased flow rate is best.
Step 3: Face the spigot and overflow valve away from the house
Place your rain barrel on top of the foundation you just installed. The spigot and overflow valve should face away from the house for you to have easy access to the spigot. Plus, the overflow valve will carry the excess stormwater away from your home’s foundation.
The overflow pipe or hose should deposit excess water in an appropriate drainage spot that is:
- At least 10 feet from the house
- Away from your lawn
- Preferably into a rain garden or storm drain
Pro tip: Connect the overflow pipe or hose to a second rain barrel to harvest even more rainwater (if your state laws allow).
Step 4: Connect the rain barrel to your downspout
You’ll most likely have to adjust your downspout in some way to connect it to your rain barrel. Here are your main options:
- Cut the downspout: Take the correct measurements and use a hacksaw to reduce the size of your downspout. Once you’ve adjusted the length, fit the end of the downspout directly into the hole on top of the barrel or connect them using a downspout flex elbow.
- Install a rain diverter: Cut a small hole in the gutter above your rain barrel, then connect the diverter from that hole to the top of the barrel. You can open and close the diverter at will. So, if your barrel is full or you’re not collecting rainwater, close the diverter, and the water will flow through your downspout as usual.
Note: Before you cut your downspout, ensure no wires are running along the inside or outside.
Estimated cost: Most homeowners pay between $120 and $160 for a rain barrel system, with the national average cost at $140.
How to use (and not use) a rain barrel

One of the biggest benefits of installing a rain barrel is you get free water for use around the house. But you can’t use the water for everything. As rainwater travels through your roof and gutters, it gathers dirt, bacteria, animal waste, and other pollutants, making it unsafe for consumption.
Here are a few ideas for how you can use collected water from a rain barrel:
- Irrigate your lawn (the most expensive lawn chore in terms of water use)
- Wash your driveway, patio, deck, or other outdoor areas
- Water your garden and houseplants
- Mop your floors
- Refill your toilet
- Wash your car
And here’s what you can not use untreated rain barrel water for:
- Bathing
- Drinking
- Cooking
- Washing dishes
- Cleaning surfaces used in food preparations
Gray area: There’s a bit of debate on whether or not it’s okay to use rain barrel water to irrigate vegetable gardens, fruit trees, herbs, and other edible plants. But you should be perfectly safe as long as you focus on watering the soil and not the edible parts of the plants. In case contact is made, thoroughly wash the produce with tap water before consuming it.
How to maintain a rain barrel
After installation, rain barrels are pretty low maintenance. However, you can do a few things to prevent damage and keep your rain barrel clean and pest-free long-term.
When to use the water
Try to use the water in your rain barrel no more than one week after rainfall. Wait any longer, and the water will become stagnant, potentially harboring bacteria and attracting mosquitoes. You also can introduce anti-larval tablets into the water to get rid of larvae that may develop into mosquitoes.
Pro tip: Even if you don’t plan to use the water, it’s a good idea to empty the barrel if it has been sitting in it for over a week.
When and how to clean your rain barrel
At least once a year, disconnect your rain barrel from its downspout and scrub it thoroughly with antibacterial dish soap and water. Scrub the inside, outside, and all the water outlets.
When you’re done, rinse out all the soapy water and leave your rain barrel to dry in the sun. Before reconnecting it, ensure the seals around the water outlets are still watertight. If not, add a fresh layer of silicone sealant.
What to do with your rain barrel in winter
Before temperatures drop below freezing, disconnect your rain barrel from the downspout, empty it, and store it upside down in the garage or shed until spring. If you live in an area that doesn’t freeze in winter, you can leave your barrel hooked up and continue harvesting rainwater year-round.
Other ways to reduce your landscape’s carbon footprint
Lawn and landscape care has more of an impact on the environment than you might think. It uses thousands of gallons of water, many of the tools run on gas, and most fertilizers and pesticides contain harmful chemicals.
Installing a rain barrel helps with water conservation, but what else can you do to reduce your carbon footprint without sacrificing the quality of your landscape? Here are some eco-friendly lawn care tips:
- Switch to phosphate-free, organic fertilizer
- Practice integrated pest management (IPM) to reduce pesticide use
- Water your lawn the right amount — don’t over- or underwater
- After mowing your lawn, mulch grass clippings
- Replace part of your lawn with a less thirsty groundcover. Good alternatives include moss, chamomile, clover, or golden star.
FAQ about installing a rain barrel
What size of rain barrel should I use?
It depends on how much water you expect to collect per week. You can estimate the amount of water using the average rainfall in your area and the size and shape of your roof.
Typically, rainwater collection through barrels can yield around half a gallon of water per square foot of roof for every inch of rain. Of course, your whole roof probably doesn’t drain into a single downspout, so for this estimate, you’ll need to approximate how many square feet of your roof drains into one downspout.
Formula: Inches of rain x 0.5 gallons of water x square feet of roof that drains into downspout = amount of water collected
For example, if your area gets an average of 3 inches of rain per week in summer, and your roof is designed so that 50 square feet drains into one downspout, your calculation would look like this:
3 inches x 0.5 gallons x 50 square feet = 75 gallons of water
So, if you wanted to collect as much rainwater as possible, you would need a 75-gallon barrel or multiple barrels that add up to 75 gallons.
Can I use a rain barrel without downspouts?
Yes. If you don’t have a downspout to drain directly into your rain barrel, place buckets around your home before the next rain to see where your roof drains the most. Whichever bucket is the fullest after rain is where you should install your rain barrel.
The process of building and installing a rain barrel is the same without gutters (except, of course, you won’t connect a spout).
How do I treat rain barrel water for drinking?
The CDC’s recommendations for making tap water safe to drink in emergencies also can be used to treat water from a rain barrel.
Methods of treating water to make it safe for drinking include:
- Boiling: Bring water to a boil for one to three minutes to kill viruses, bacteria, and parasites. Let the water cool for a few hours before drinking.
- Adding disinfectants: You can add a small amount of unscented household liquid chlorine bleach or chlorine dioxide tablets to decontaminate the water. However, the EPA set 1 mg/L of chlorite and 0.8 mg/L of chlorine dioxide as the maximum amount for drinking water to be safe for consumption.
- Using a water filter: If your household water filter is labeled as certified for NSF/ANSI Standard 53 or 58, it can remove disease-causing parasites from water. However, filters don’t get rid of bacteria or viruses.
Hire a local pro to install your rain barrel
A rain barrel is a good option if you’re environmentally conscious and want to conserve water. Still, you might not want to take up installing your own rain barrel. So, contact a local gutter pro who knows best how to install a rain barrel. They can discuss options, your budget, and the entire installation process so you can have peace of mind and water for your lawn.
Main Photo Credit: Ian Mackenzie | Flickr | CC BY 2.0