
Have you ever dreamed of getting a beautiful green yard? With a little work and a fair amount of fertilizer, your dream can become a reality. Don’t know how to fertilize your lawn? Don’t worry! From picking the right product to fertilizing at the right time of year, our Fertilizer 101 guide has you covered. You don’t need to be a pro to get the greenest lawn in the neighborhood.
- How to fertilize your lawn in 13 simple steps
- Step 1: Calculate your lawn’s square footage
- Step 2: Calculate how much fertilizer your lawn needs
- Step 3: Conduct a soil test
- Step 4: Pick the right fertilizer
- Step 5: Pick a fertilizer spreader
- Step 6: Check the weather
- Step 7: Prepare your lawn
- Step 8: Wear protective gear
- Step 9: Read all product instructions
- Step 10: Prepare your fertilizer
- Step 11: Apply fertilizer to your lawn
- Step 12: Follow post-application instructions
- Step 13: Clean up
- The best time to fertilize your lawn
- The different types of fertilizer
- Fertilizer tips and tricks
- FAQ on fertilizing your lawn
How to fertilize your lawn in 13 simple steps
Fertilizing your lawn is quite simple, but it’s also easy to over-fertilize (or under-fertilize) your turf. Applying too much fertilizer can harm your grass while under-fertilizing won’t give your lawn enough of the three essential nutrients – nitrogen, phosphorus, and potassium – it needs to grow. Both can result in a patchy, uneven lawn.
Step 1: Calculate your lawn’s square footage

Calculating your lawn’s size will help you determine how much fertilizer you need for the job.
You’ll need to calculate your lawn area in square feet. If your lawn has a distinct shape, like a rectangle, circle, or square, then that shape’s area is all you’ll need to calculate. Pretty easy!
But if your lawn doesn’t have a distinct shape, then you’ll need to:
- Break the lawn up into imaginary shapes
- Calculate the square footage of each imaginary shape
- Add each imaginary shape’s area to get the total area of your lawn
Need a quick lesson on calculating the square footage of different shapes?
- Square: Length x Width
- Rectangle: Length x Width
- Circle: 3.14 x Radius x Radius
- Triangle: (Height x Base) / 2
Step 2: Calculate how much fertilizer your lawn needs
It’s common for homeowners to over-apply fertilizer, which can negatively affect your turf and the environment. Rainwater washes excess fertilizer away as runoff into streams, rivers, and ponds, creating a toxic environment for aquatic organisms.
To minimize your fertilizer’s impact, you must apply your fertilizer responsibly, and that includes making the proper calculations.
Plugging in more numbers might sound daunting, but don’t worry –– there won’t be a Fertilizer 101 exam.
When fertilizing your lawn, you’ll want to aim for 1 pound of nitrogen per 1,000 square feet. Your soil test also can help you determine how much fertilizer you need; they also can tell you exactly how much to use.
Let’s say your soil test recommends a fertilizer with the N-P-K ratio 29-0-5, which is 29% nitrogen, 0% phosphorus, and 5% potassium.
The goal is to determine how many pounds of fertilizer you need to spread across the lawn to achieve 1 pound of nitrogen per 1,000 square feet. It’s much simpler than you might think:
- Convert 29% to a decimal, which is 0.29.
- Divide 1 pound of nitrogen by 0.29. The result is how many pounds of 29-0-5 fertilizer you’ll need to achieve 1 pound of nitrogen per 1,000 square feet.
(1 pound of nitrogen) / 0.29 = 3.45 pounds of 29-0-5 fertilizer is needed to supply 1 pound of nitrogen per 1,000 square feet.
Step 3: Conduct a soil test

You can’t give your grass a healthy dose of fertilizer if you don’t know which nutrients the soil is lacking and which it already has. You won’t do your lawn much help if you ignore where the soil is deficient.
The best way to determine the right amount of nitrogen, phosphorus, and potassium (N-P-K) for your turf is conducting a soil test. At-home soil kits are available, but they won’t tell you your soil’s precise nutrient levels. While a little more expensive, sending a soil sample to your local county extension office will provide you with the most detailed results.
Soil tests can also tell you about your soil’s pH levels, which are also important to your fertilization efforts. Nutrients transform into unusable forms when the soil is acidic (has too low pH) or alkaline (has too high pH). So, you’ll need to make sure your lawn’s soil is in the proper pH range. Turfgrass likes soil that is more neutral, thriving in soil with a pH range of 6 to 7.
Step 4: Pick the right fertilizer
Now, you should pick a fertilizer that suits your lawn’s needs. You can use your soil test results to find out what N-P-K ratio your fertilizer needs to be. Most soil test results from a soil lab will tell you the fertilizer N-P-K ratio your lawn needs.
There should be a sequence of three numbers on the fertilizer bag or bottle. They correspond to the N-P-K ratio.
Make sure to buy enough fertilizer to cover your whole lawn using the calculations in Step 1.
Step 5: Pick a fertilizer spreader

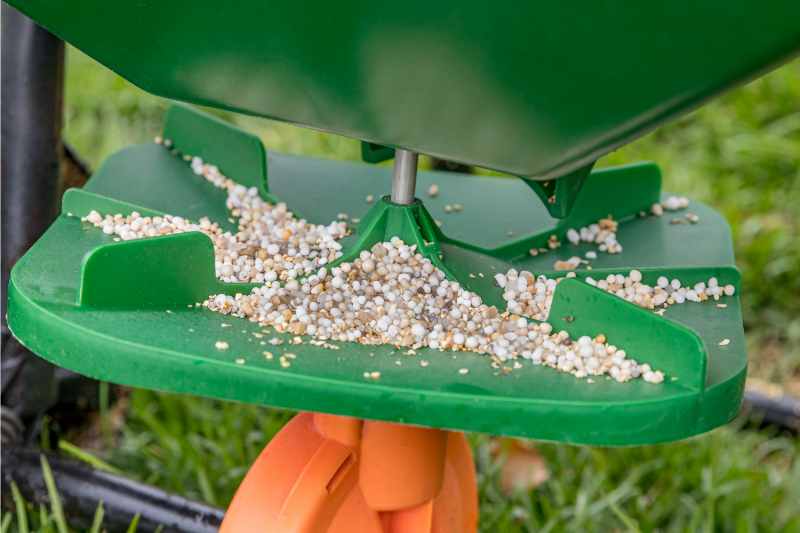
If you’re using granulated fertilizer, you’ll need to pick a fertilizer spreader to go along with it. The size of the spreader will depend on how big your lawn is. Granular fertilizers need to be loaded into a fertilizer spreader for even application. There are three spreaders you can use:
- Rotary spreader. Also called a broadcast spreader, this spreader is best for medium to large yards that are 2,000 square feet or bigger. They are push-powered and distribute fertilizer granules 3 to 5 feet away from the spreader using a spinning plate. This tool looks like a small wheelbarrow.
- Drop spreader. This spreader is best for smaller lawns that are less than 2,000 square feet. They are also push-powered, but they differ from rotary spreaders because they drop the fertilizer straight down onto the ground between the spreader’s wheels.
- Hand-held spreader. This spreader is great for tiny or tight areas in your lawn. The device is equipped with a handle that you crank to expel the granules.
Can you spread granular fertilizer by hand? We don’t recommend spreading granular fertilizer by hand without a spreader. It’s challenging to apply fertilizer evenly without the help of a spreader. Fertilizing by hand is likely to result in uneven patches of green grass, and in many cases, you’ll be able to see the path of your throws appearing as streaks in the lawn.
Step 6: Check the weather
Rain – especially heavy rain – is the bane of fertilizer. While some fertilizers appreciate a little water, none like a downpour. Too much rain can wash away the nutrients from the soil and flush them into bodies of water.
Always check the weather forecast before applying fertilizer. If it doesn’t predict rain for at least two days after you fertilize, you’re in the clear. A small rain shower a couple of days before fertilization is OK, as long as the grass is dry before you fertilize. You’ll need to give your grass a thorough watering anyway, so a small shower means less work for you.
The bottom line: Don’t fertilize your lawn immediately after a rainstorm, and don’t fertilize when rain is in the forecast.
Step 7: Prepare your lawn

Before you fertilize, you’ll need to water your lawn, mow the grass, deal with weeds, and adjust your soil’s pH levels (if needed).
First, change your soil’s pH levels if it really needs it. Liming your lawn will make it less acidic while adding elemental sulfur will make it less alkaline.
Next, you’ll need to reign in the weeds. The easiest way to get rid of weeds is to use herbicides: Use a post-emergent herbicide to kill existing weeds and pre-emergent weed killers to prevent new ones from sprouting. If you do use herbicides, you’ll need to wait about a week before you can fertilize your lawn.
Then, we recommend that you mow your lawn a few days before fertilizing it, especially if it needs a trim anyway. Mowing your lawn directly after fertilizing it can actually harm your grass, so you’ll need to wait a few days after you fertilize before you can mow. It’s also easier to evenly fertilize a mowed lawn. The nutrients can reach the soil faster, too.
Lastly, you’ll need to water your lawn. Watering the lawn about one to two days before you plan to fertilize it prepares the soil to receive nutrients. Make sure your grass is dry before adding fertilizer, though.
Step 8: Wear protective gear
Nitrogen in the fertilizer can cause chemical burns on the skin. Keep yourself well protected by wearing gloves, safety goggles, close-toed shoes, long pants and sleeves, and a dust mask.
Step 9: Read all product instructions
Misusing fertilizer can cause serious harm to you and the environment. Read all product instructions carefully before fertilizing.
Some fertilizer brands may have special instructions that are not mentioned here in our guide. They can tell you if they need to be watered in directly after being applied, or how long to wait before you can water your lawn.
Step 10: Prepare your fertilizer
You’ll need to prepare your fertilizer before applying it to your lawn. This will differ based on whether you’ll be using granular fertilizer or liquid fertilizer.
How to prepare granular fertilizer
Granular lawn fertilizer is a dry fertilizer that typically comes in the shape of pellets. Most granular fertilizers are slow-release fertilizers, which means they slowly release nutrients to grass over a long period.
You’ll need to prepare your spreader and fill it with fertilizer. Here’s how to do it:
- You’ll need to calibrate your spreader to release a certain amount of fertilizer, and many fertilizer products have instructions on how to set the spreader. It’s a good idea to make two passes over your lawn instead of one, so you’ll want to calibrate the spreader to deliver half the desired application rate.
- Close the hopper hole before adding fertilizer.
- Pour the fertilizer into the hopper. Add the fertilizer to your spreader over a driveway, patio, or other hard surface. This will prevent an accidental spill from harming your grass.
Pro tip: Place a tarp beneath your spreader before you load it. It will make cleaning up spilled fertilizer much easier. You can put the spilled fertilizer back into the bag.
How to prepare liquid fertilizer
Liquid fertilizer often comes in a ready-to-spray bottle which you attach to the garden hose. If yours is in ready-to-spray form, simply attach the spray applicator to the hose.
Some liquid fertilizers come in a concentrated form. You’ll need to dilute it with water and add it to a handheld or backpack sprayer. Check the instructions for the proper ratio of water to fertilizer.
Liquid fertilizer also can begin as a dry, water-soluble substance that the user must dissolve in water.
Step 11: Apply fertilizer to your lawn

Once you’ve calculated how much fertilizer you’ll need, put on the right gear, and read all the instructions, it’s time to get to work. This process will also be different depending on whether you’re using granular fertilizer or liquid fertilizer.
How to fertilize with granular fertilizer
- Starting in one corner of your yard, push your spreader at a consistent pace around the perimeter. Most rotary spreaders send the granules 3 to 5 feet away from the spreader. Position your spreader so that the granules land right at the edge of the bordering driveway, sidewalk, or patio.
- Once you’ve walked along the whole perimeter, it’s time to make the first pass inside its border. Position the spreader within the perimeter. Starting from one corner, walk forward straight. If you’re using a rotary spreader, pay close attention to where the fertilizer lands.
- Once you’ve reached the perimeter, turn the spreader and walk forward again, leaving enough space between where the previous granules landed and where the next batch will land.
- Continue walking in straight lines parallel to your last pass. If you’re using a rotary spreader, keep a few feet in between your rows. If you’re using a drop spreader, you don’t need to leave any space in between your rows.
- After covering the whole lawn, turn 90 degrees and make your second pass across the yard, creating a grid pattern.
Pro tip: Close the hopper hole when you need to turn or stop to prevent excess fertilizer from being spread.
How to fertilize with liquid fertilizer
Applying liquid fertilizer evenly can be tricky if you don’t know what you’re doing. Many homeowners have found that liquid fertilizer results in an uneven and patchy lawn.
- Pick a side to start fertilizing and face the edge.
- Spray the fertilizer from side to side, making sure to evenly cover the grass in front of you. Keep track of where you’ve sprayed to avoid over-spraying parts of your lawn. Avoid walking in spots you’ve already fertilized.
- Walk backward and continue spraying until you reach the other side of the lawn. Make sure to get the irregular spots on your lawn.
Pro tip: Don’t apply liquid fertilizer on a windy day, as the wind can disrupt your application.
Step 12: Follow post-application instructions
This last step will vary depending on your fertilizer brand. Some products require light watering after applying fertilizer, while others recommend delaying water.
Step 13: Clean up
If you’re using granular fertilizer, take a leaf blower (or broom) and blow any excess fertilizer that landed on the driveway, sidewalk, or patio back onto the grass. The fertilizer can stain these surfaces.
Put excess fertilizer back into the bag or container and store it where pets and children can’t reach them. Then, rinse your spreader or sprayer with a hose and stow it away.
The best time to fertilize your lawn
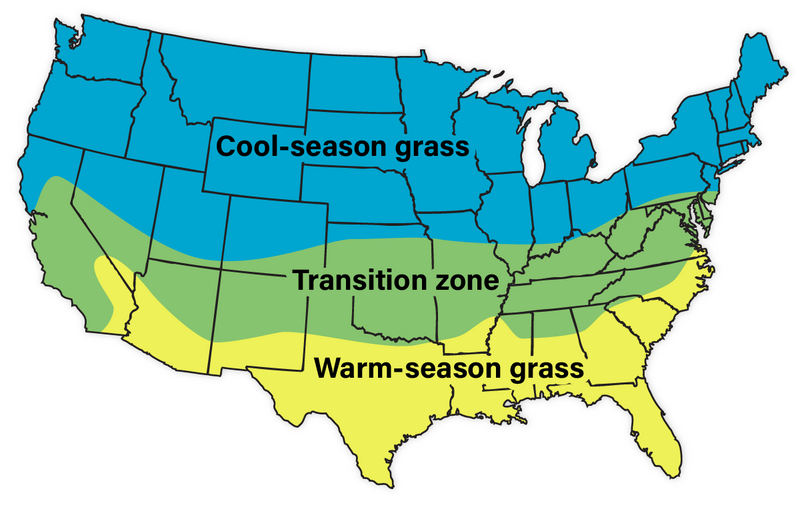
The best time of year to fertilize your lawn will depend on whether you have warm-season or cool-season turf. It’s best to feed your lawn with fertilizer during its active growing season so it can make use of the nutrients.
Typically, you’ll have cool-season grass when you live up north where the winters are frigid and the summers are mild. If you live down south where the summers are scorching and the winters are mild, then you probably have warm-season grass. Those living in the middle (the Transition Zone) can have either type of grass.
- Cool-season grass: Fertilize Kentucky bluegrass, perennial ryegrass, tall fescue, and fine fescue during the cooler periods of late spring, early fall, and late fall. Aim for daytime air temperatures around 60 to 70 degrees.
- Warm-season grass: St. Augustine, Zoysia, centipede, bahia, and Bermudagrass will do better with a late spring or early summer fertilization. Wait until the air temperatures hover around 80 degrees.
You’ll need to fertilize your lawn twice a year. Don’t fertilize more than four times a year.
What about the time of day? It’s best to fertilize your lawn in the early morning after the dew has dried up but before it gets too hot. Your fertilizer can burn your grass when exposed to the scorching sun. The next best time to fertilize is in the early evening.
The different types of fertilizer
We talked about granular and liquid fertilizers, but they only describe how the fertilizer is applied. There are other types of fertilizer you can use:
- Slow-release fertilizers. These fertilizers release their nutrients over a longer period of time. They’re better for your turf’s long-term health and can provide nutrients to your turf for much longer. Most granular fertilizers are slow-release fertilizers.
- Quick-release fertilizers. As their name suggests, they provide nutrients to your turf more quickly. These fertilizers are great for struggling lawns that need a burst of nutrients, but they will need to be applied more often. Many liquid fertilizers are quick-release fertilizers.
- Organic fertilizers. These products are derived from plant or animal sources, such as compost, fish emulsion, and blood meal. They help improve your soil’s health and are less likely to burn your grass. These fertilizers are typically more expensive.
- Inorganic fertilizers. Also called synthetic or chemical fertilizers, these products are man-made. They have a higher concentration of nutrients and are usually cheaper than their organic counterparts. However, they’re more harmful to the environment.
- Weed-and-feed fertilizers. These fertilizers contain a weed killer to combine weed control and fertilization. They can have a pre-emergent herbicide to prevent weeds (like crabgrass) or a post-emergent herbicide to kill existing weeds.
- Starter fertilizers. These fertilizers are made specifically for new grass. They provide nutrients that may be a bit more difficult for new plants to access such as phosphorus, which is crucial for growing healthy and strong roots.
- Seasonal fertilizers. Some fertilizers are made to be used during specific seasons. Don’t use these fertilizers outside of their intended season.
Fertilizer tips and tricks
Here are some extra tidbits of knowledge that can help you ace your lawn fertilization attempts:
- Apply fertilizer to green lawns. Don’t fertilize lawns that have gone dormant. Stressed lawns can’t use nutrients properly, and the fertilizer may injure dormant turf.
- Wait for your grass to green up after winter before fertilizing your lawn. The ground should have thawed by then, so there’s no risk of the fertilizer being washed away or not reaching the ground. The fertilizer has to come into contact with the soil to work, which can’t happen if the soil is frozen.
- Avoid fertilizing near rivers, lakes, and other bodies of water as the fertilizer can run off into them. Fertilizers can be toxic to animals, especially fish. They can also cause algal blooms that can wreak havoc on the environment. Stay about 6 to 8 feet away from bodies of water when fertilizing.
- Keep pets and children away. Fertilizers can harm your kids and furry friends, so you want to prevent them from playing in the grass while fertilizing and until the product gets absorbed into the soil. Waiting until the next day before letting them play should be enough.
FAQ on fertilizing your lawn
What do the three numbers on my fertilizer bag mean?
These three numbers represent the three nutrients essential to turfgrass growth: Nitrogen (N), phosphorus (P), and potassium (K). Nitrogen is the most important nutrient your grass needs.
Most store-bought fertilizer bags display the ratio of these three numbers in the order of N-P-K. For example, a package showing 20-0-3 means the fertilizer contains 20% nitrogen, 0% phosphorus, and 3% potassium (also known as potash in the context of fertilizer).
How much does it cost to fertilize your lawn?
Fertilizing your lawn with granular fertilizer DIY can cost between $40 and $320 depending on the size of your lawn. You can save quite a bit of money by fertilizing your lawn yourself, but you’ll be paying in precious time and elbow grease.
The cost of professional lawn fertilization is around $120 to $480 per service, with an average of $335.
How do you reverse fertilizer burn?
You will need to flush out the nitrogen out of your soil with lots of water to reverse fertilizer burn. Too much water will wash away nutrients, including nitrogen (which causes fertilizer burn). While that’s normally not something you want, this case is the exception.
Yellowing, tanning, and browning of grass after fertilization can be a sign of nitrogen burn. Take action as soon as you see this to increase your turf’s chance of survival. Grass that has died completely from fertilizer burn needs to be replaced with new grass seed or sod, especially if it’s a bunch-type grass species like tall fescue.
Graduate Fertilizer 101 with a healthy lawn
Fertilizing your lawn is an important part of keeping it green and beautiful, and it’s easy to do. However, it does take time and some effort to do properly. It may be tempting to take shortcuts — skipping directions, not waiting until rain passes, spreading by hand — but it will cause you to fail and waste time.
Not all homeowners have the free time to fertilize their lawns on a regular schedule. If you’re one of these people, don’t fret! Lawn Love can connect you with lawn care pros in your area who can take charge. They can fertilize your yard and do other mundane but necessary lawn maintenance tasks to keep your grass in tip top shape.
Main Photo Credit: Shutterstock