
A soil test can tell you a lot about the dirt your grass calls home, such as how well it can actually support your turf. If your lawn is having trouble growing, it might be in your best interest to conduct one of these tests. If you don’t know how, then we’ll teach you how to soil test your lawn. It’s not difficult at all; you just have to get your hands a little dirty.
What can a soil test tell you?
While most people conduct soil tests to determine their soil’s pH and nutrient levels, they also measure other factors that will affect turfgrass growth. You may see these numbers reading your soil test report:
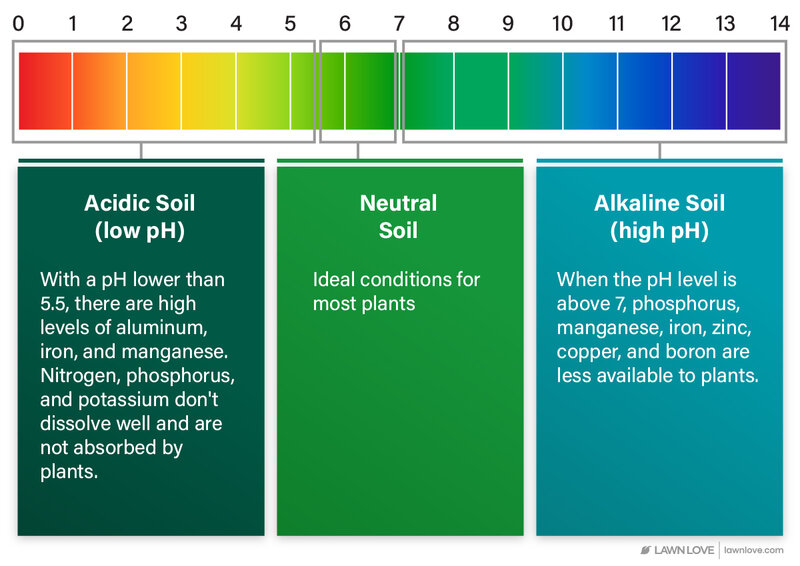
- Soil pH. It’s the measurement of how acidic or alkaline your soil is on a scale of 0 to 14. If you have acidic soil (5.5 and below) or alkaline soil (above 7), plants will have trouble absorbing nutrients like nitrogen, phosphorus, potassium, and iron. Soil pH can be affected by rain, microbes, fertilizer, and your location.
- Nutrient levels. A soil test can tell you if you have enough primary nutrients (nitrogen, phosphorus, and potassium), secondary nutrients, and micronutrients in your soil. These nutrients are important for plant growth.
- Cation exchange capacity. It’s a measurement of your soil’s capacity to hold nutrients. The higher the number, the more nutrients your soil can hold.
- Base saturation. This measures how much of your soil’s nutrients are useful. Typically, the higher the number, the more fertile the soil.
- Organic matter. Organic matter is any material that comes from living things like animals and plants. The higher the number, the healthier the soil.
- Salinity. Your soil can accumulate excess salt, which can lead to dehydration, drought stress, and higher soil pH levels.
Your soil test also may tell you what fertilizer or amendments your lawn needs, depending on the test.
How to soil test your lawn

There are two ways to test your soil’s health: sending a soil sample to a laboratory or using a DIY soil test kit. Both options have different procedures, so we’ll outline their differences below:
Option 1: Send soil samples to a lab
Sending soil samples to a lab is the most precise way to know what’s going on with your lawn’s soil. Professional soil testing also will do more than just reveal your soil’s nutrients and pH level; it also can provide you with fertilizer and amendment recommendations to manage your soil.
You have two options when it comes to professional lawn soil testing. You can send a soil sample to a private soil laboratory or your local Cooperative Extension Office.
Most Cooperative Extension offices offer soil-testing services for low prices. If they don’t provide one, they can help you find a testing service familiar with soil in your location. Check with your local Cooperative Extension Office for more information.
Because soil tests vary by location, using the same office for multiple tests ensures consistency. Just be prepared to wait a few weeks to get your soil test results.
| Pros of lab soil test | Cons of lab soil test |
| ✓ Reveals your soil’s pH level ✓ Reveals precise nitrogen, phosphorus, and potassium levels ✓ Reveals other nutrient levels, such as iron and calcium ✓ Will provide detailed measurements ✓ Provides fertilizer and amendment recommendations to remedy your soil ✓ Reasonably affordable | ✗ The costs can add up if you need to do multiple tests ✗ Often recommend chemical heavy fertilizers, which may make your lawn more acidic over time ✗ Not as convenient as a simple at-home soil test ✗ May take a few weeks before you receive your results |
How to collect a soil sample for lab testing
You will need to send your soil in a plastic container or a baggie. Sometimes, the lab will provide sample bags for you to ship the soil in.
Not just any soil will do. Different soil testing labs may have different protocols, so it’s better to call and ask. However, the process is usually pretty similar. We’ll get into detail about each step, but here’s how to collect a soil sample to send to the lab:
- Gather your clean tools.
- Map out where to take soil samples.
- Dig and collect soil samples.
- Mix your soil and let it dry.
- Send the soil samples.
Just make sure you’re gathering soil that isn’t wet from rain or irrigation. Wet soil will give you an inaccurate result.
1. Gather your clean tools.
To collect your soil samples, you’ll need the following tools and materials:
- Shovel
- Garden trowel
- Plastic container or baggie
- Plastic bucket
- Newspaper
Make sure your tools are clean and rust-free. You want to use plastic containers as metal can contaminate the samples.
2. Map out where to take soil samples.
Most labs will recommend taking soil from 10 to 15 different spots on your lawn to get an accurate profile of your soil. Try to map it out so that you take samples in a zigzag pattern.
Don’t take soil from areas where you have already applied lawn fertilizer and soil amendments. You also want to avoid mixing soil from wildly different areas. For example, don’t add soil from an area that’s close to water.
You also shouldn’t mix soil from your lawn and soil from your vegetable garden, flower beds, and ornamentals. If you want to test your garden soil, you need to perform a separate test and send in a different sample.
3. Dig and collect soil samples.
Dig a hole 6 to 12 inches deep in one of the spots you’ve marked for sampling, depending on what your soil lab recommends. Try to dig straight down.
Cut a ½-inch slice from the side of the hole with your shovel and trim off the sides. Remove thatch, plant material, and macroorganisms, like worms, from the soil. You should end up with a clean vertical slice of soil. Place the soil in your bucket.
Repeat this process for each area you’ve marked for sampling.
4. Mix your soil and let it dry.
Using your trowel, mix up the soil samples in the bucket. Then, take about a cup or two of the mixed soil and spread it out on the newspaper. Let it dry out at room temperature and protect it from moisture.
5. Send the soil samples.
Place the soil samples in a plastic container or baggie. Label the container and mail it to the lab for analysis.
Option 2: Use a DIY soil test kit
If you want quick results, you can buy a DIY home soil test kit from a garden supply store or a hardware store. A simple soil test kit can reveal whether your soil has a high or low pH. More complicated test kits assess your soil’s nutrient levels, particularly nitrogen, phosphorus, and potassium.
However, DIY soil test kits aren’t always the most precise. Accuracy can vary from one test kit to another. Additionally, results usually don’t provide clear instructions on how to remedy the soil. For example, an at-home soil test might reveal your soil is low in nitrogen, but it won’t reveal how much nitrogen fertilizer to apply to fix the soil.
| Pros of DIY soil test | Cons of DIY soil test |
| ✓ Reveals your soil’s pH level ✓ Shows whether nitrogen, phosphorus, and potassium levels are low, normal, or high ✓ Convenient and inexpensiveProvides instant results | ✗ Can be inaccurate ✗ Doesn’t provide clear instructions on how to remedy soil ✗ Doesn’t determine if there are diseases in the soil |
How to use a DIY soil test kit
Because at-home test kits vary so vastly, it’s essential to follow your test kit’s instructions. Some tests are designed to measure pH, while others measure nutrient levels.
You also might discover that different test kits come with different materials. Most test kits require distilled water, so have some on hand.
Here is a basic example of how to test your soil pH with a La Motte soil test kit:
- Collect your sample. Take your sample following your test kit’s instructions. Make sure to test different areas of your lawn, as results may vary depending on factors like underlying soil differences and localized conditions.
- Dry your soil. You always want to take samples when the soil is dry, as wet soil can lead to inaccurate results. Spread the soil out on dry paper and let it dry.
- Clean. Make sure your soil is evenly textured, and remove debris and rocks.
- Fill and shake. Fill one of the test tubes to the fourth line with the pH indicator solution. Use the 0.5-gram spoon to add three scoops of soil to the tube and shake for one minute.
- Settle. Set the test tube for about 12 minutes to let the mixture settle.
- Compare. Standing with the sun behind you, compare the color of the mixture with that on the pH color chart.
- Other tests. Follow the instructions to do tests for nitrogen, potassium, and phosphorus.
Other tests for your soil

There are some other tests you can do to know more about your soil. These tests don’t require any special equipment:
Soil type test
There are many types of soil, but the three most common ones are sandy soil, clay soil, and loamy soil.
- Sandy soil is made up of loose soil particles that give it excellent drainage but horrible moisture retention. It’s also not very fertile
- Clay soil has fine soil particles that like to stick together. It holds its shape, which helps retain water. It’s also quite high in nutrients. However, it gets compacted easily and doesn’t drain well at all.
- Loamy soil is the best soil type among these three. As a harmonious blend of clay, sand, and silt, it holds moisture but still has good drainage. Loamy soil is fertile and rich in nutrients.
Here’s a quick test that can give you an idea of what type of soil you have:
- Take some moist soil.
- Squeeze it hard, then let go.
- Observe what happens to your soil:
- If it holds its shape but crumbles when disturbed, then you most likely have loamy soil.
- If it holds its shape even when disturbed, then you most likely have clay soil.
- If it falls apart immediately after letting go, then you most likely have sandy soil.
Percolation (drainage) test
Another test you can do is a percolation test. Also called a perk test, it tests your soil’s drainage capability. Knowing how well your soil retains water can help you adjust your lawn irrigation. Here’s how to do a percolation test:
- Wait for clear weather. You want to do this test when it hasn’t rained in a few days.
- Dig a hole about 1 foot deep and 4 to 12 inches wide.
- Fill the hole with water and let it drain completely. This can take a few minutes or a whole day, but this will saturate the soil with water.
- Refill the hole with water and measure the water’s depth in inches.
- Set a timer for 15 minutes and then measure the water’s depth in inches again.
- Calculate the drop in water level by subtracting the two measurements.
- Multiply the result from step six by 4. This is how much water your soil drains in an hour.
Ideally, your soil should drain 1 to 3 inches of water per hour. Anything less than 1 inch per hour is poor-draining soil, and anything more than 4 inches per hour is very well-draining soil – perhaps even too well-draining.
FAQ on soil testing your lawn
When is the best time to test your soil?
While you can test your soil pretty much year-round, the best time to test your soil is around early spring before you add compost, fertilizer, or other soil amendments. You also can test in the fall before treating your soil if you have cool-season grass.
How often should you test your soil?
Experts recommend testing your soil every three years at roughly the same time of the year. However, you should consider testing your soil if your lawn is having issues.
How do you change your soil’s pH level?
You can use soil amendments to change your soil’s pH level. For example, adding lime or wood ash to your lawn will raise your soil’s pH, while sulfur will lower it. A pH range of 6 to 7 should be good for most turfgrasses.
Don’t soil your lawn’s health
Taking care of your lawn’s soil is only one step toward a healthy lawn. You must still mow your lawn properly, irrigate responsibly, and fertilize appropriately. You may even need to do special lawn treatments like dethatching and aeration.
If you don’t have the time to take care of your lawn, consider hiring a lawn care professional to do it for you. Lawn Love can connect you with capable pros in your area who can take care of mowing, fertilizing, and everything else so you can have a green lawn. Hire a lawn care pro through Lawn Love today.
Main Image Credit: Pexels