
New England boasts a splendiferous fall when magnificent maples and other deciduous trees showcase their myriad of vibrant foliage. However, before you are tempted to travel near and far for the ultimate leafage views, you first need to do some fall lawn care.
Cool-season grasses, such as Kentucky bluegrass, perennial ryegrass, fine fescue, and tall fescue, weather well in New Haven. They successfully brave the frigid winters and easily tackle the swings in temperatures.
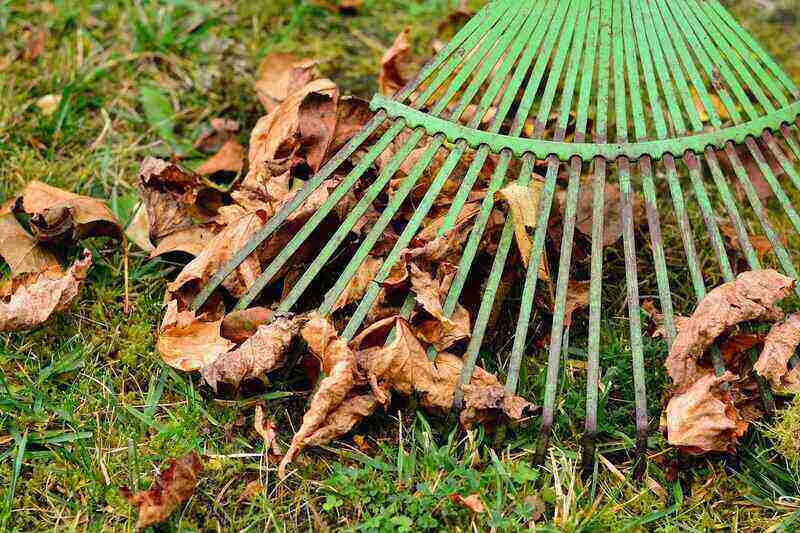
1. Rake regularly
Unfortunately, those gorgeous leaves eventually blanket your lawn. To maintain a healthy lawn, rake every three to four days, depending on the expediency of cascading leaves. Left to accumulate, these mounds of fallen leaves will:
- Block sunlight, water, and other nutrients from penetrating the soil
- Result in disease and decay on your lawn
- Invite unwanted pests
The removal of leaf “volcanoes” ensures healthy, oxygen-rich soil in the spring.
If your lawn is too large to rake, or if your property is heavily forested, consider a leaf blower. Here are some of the pros and cons for different blowers:
Gas blower:
- Most expensive
- Very powerful
- Heavy
- Releases smoke
- Noisy
Corded:
- Reasonably priced
- Lightweight
- No pollution
- Lacks mobility; needs to be attached to a power outlet
Battery-powered:
- Reasonably priced (but higher-quality batteries give out more power than those bundled with blower)
- Need to be recharged
- Restricted by battery strength
Before investing in a blower, check with your town’s regulations or contact the Noise Pollution Clearinghouse for a list of local guidelines. Some areas restrict blower usage to certain hours or might totally ban leaf blower usage.
Don’t trash those leaves. If you haven’t done so already, start a compost pile. Leaves contain carbon, an essential component for photosynthesis and, subsequently, your lawn’s success.
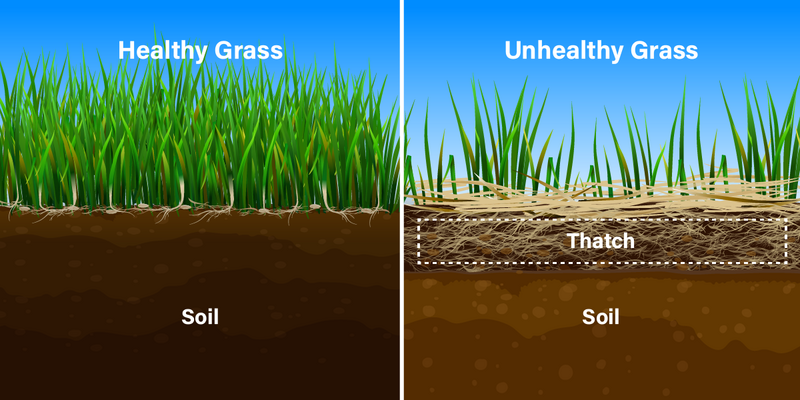
2. Control thatch, if necessary
Thatch is a tightened layer of dead stems, roots, and other organic matter settled above the soil, beneath the grass blades. This layer, depending on the thickness, can be either beneficial or detrimental to your grass.
If more than ½ inch thick, thatch will:
- Lead to grass decay and fungal diseases
- Stymie the flow of air, water, and fertilizer
- Provide a breeding ground for unwanted insects
If the thatch is less than ½ inch thick, it:
- Protects against soil temperature fluctuation
- Retains water efficiently
- Acts as a mulch
Ways to prevent thatch buildup:
- Water your lawn infrequently and deeply instead of frequently and shallow
- Don’t be heavy handed with fertilizer
- Mow regularly
- Regularly test your soil
To determine if your thatch needs to be removed, perform this simple test:
- Look for patchy brown spots or weeds in your lawn
- Push a measuring stick into the grass and measure the spongy layer between the grass and the soil — if it’s ½ inch or more, it’s necessary to dethatch
Dethatching is the removal of excess thatch, that layer of debris and other organic matter settled in between the grass blades and the soil’s surface. In simple terms, dethatching is a powerful, energetic raking.
If you need to dethatch, you have some issues to consider:
- How much thatch needs to be removed
- The size of your yard
- Can you “muscle” the job yourself?
Four methods to dethatch:
- Thatch rake: Ideal for small lawns with minimal thatch problem
- Electric/corded thatcher: Ideal for medium lawns with mild to medium thatch problem
- Power rake: Best for large, dense lawns with a serious thatch problem
- Vertical mower/verticutter: Best for large lawns with a serious thatch problem
Keep in mind, the best time to dethatch your cool-season grass is in early fall, while it’s actively growing and the soil is moist. If you need a hand or two to assist, especially if you have a serious thatch problem, contact a professional lawn care service in New Haven.
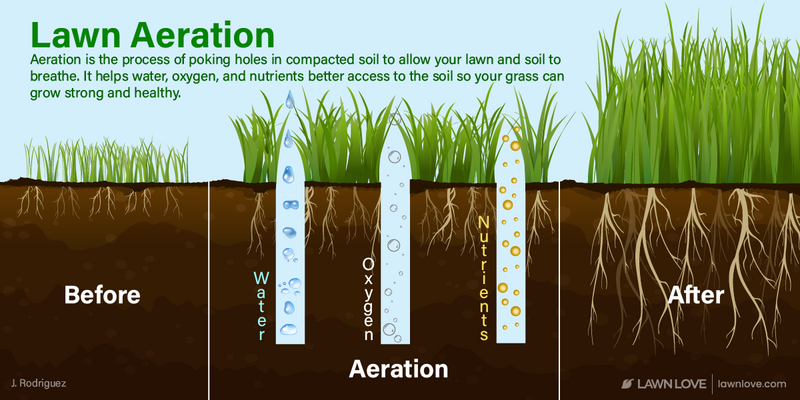
3. Aerate
Aeration is removing small plugs of soil from your lawn or punching the soil, creating small holes. Aerating provides space for water, oxygen, and other essential nutrients to penetrate the grass roots.
The ideal time to aerate cool-season grasses is fall during the growing season. The grass will then have time to fill in before Old Man Winter pays a long visit. The second best time is spring. Never aerate in the summer when cool-season grasses suffer heat stress.
You need to aerate if your lawn has:
- Heavy foot, vehicle or large equipment traffic
- Thick, clay soil
- Compacted soil
Benefits of aeration:
- Reduces compaction
- Improves circulation and absorption of air, water, and other nutrients
- Stimulates roots
- Energizes the lawn
What is compaction? Compaction exists when soil particles are tightly pressed together. Great density, reduced pore space, less water saturation, and reduced drainage exist when the soil is compacted. None of these conditions assist the lawn with healthy growth.
The state of your soil and the level of damage determine the aeration method.
- Spike or solid tine aeration
- Hollow tining or core aeration
If you have minimal compaction use either a spike, or solid tine, aeration method:
- Use a rake or heavy spike placed on soles of your shoes
- Machine with spikes, or tines, on the ends that can be pushed across the lawn
For heavy damage or compaction, use a core aerator which is a large, expensive piece of machinery. You can rent one from your local nursery, but there’s a skill level required. It’s highly recommended you contact a professional to operate a core aerator.
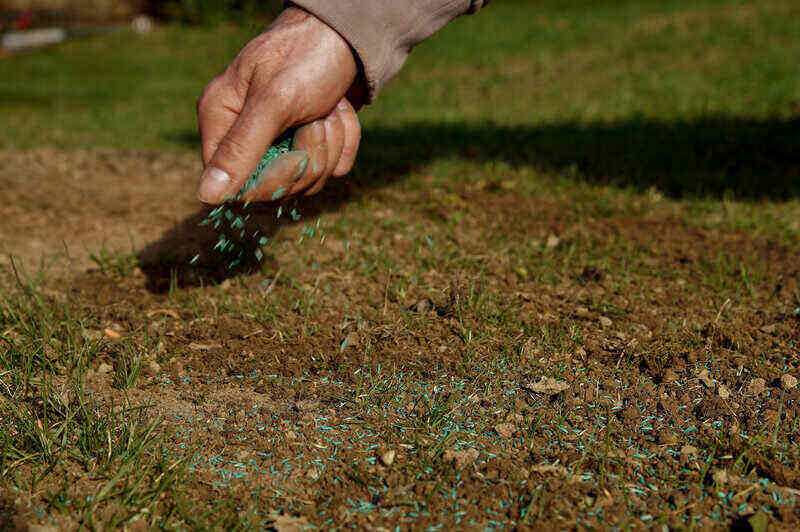
4. Overseed
Overseeding involves spreading grass seed on top of your existing lawn. It’s a simple process that assists in energizing bare spots or thinning grass. You are not starting up a new lawn, but rather, spreading grass seed that will germinate new growth in patchy areas.
The optimum time to overseed cool-season grass, such as those grown in New Haven, is early fall when the air temperatures get cooler allowing enough time for germination before the summer heat sets in. However, if you do decide to overseed in the summer, you need to be very diligent about watering so the grass is able to retain enough moisture.
- Mow to about 1 ½ inches to 2 inches
- Dethatch
- Aerate
- Apply compost
- Perform a soil test
- Fertilize, if soil test reveals you need to do so
- Spread seed
- Rake to spread the seed evenly
- Water daily or even twice daily
- Keep seeds moist, not soggy
Advantages of overseeding:
- Wards off weed competition
- Renews the lawn’s health and color
- Fills in bare spots
- Improves density
5. Mow until it stops growing
In the fall, the tendency is to focus on raking up all those fallen leaves. However, you also need to continue mowing. If the air temperature is between 55 degrees and 75 degrees, your cool-season grasses continue in a growing mode. Below 55 degrees, the rate of growth declines.
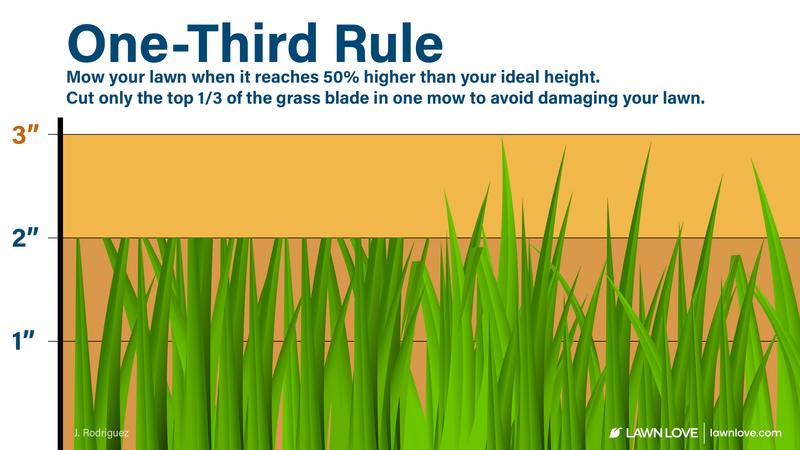
Heed the one third rule of mowing. Simply stated: Do not cut off more than one third of the grass blade at each mow. A deeper cut weakens and inhibits root growth.
The following are recommended heights for your cool season grasses;
Kentucky bluegrass: 2.5-3.5 inches
Perennial ryegrass: 1.5-2.5 inches
Tall fescue: 2-3 inches
Fine fescue: 2-2.5 inches
In general, New England lawns should be between 2 to 3 inches in height. For the definitive answer regarding your specific grass species, contact your New Haven extension office.

6. Fertilize, if need be
We seem to be continually bombarded with advice on supplementing our diet with vitamins and protein shakes. Well, your lawn just might need that same boost to kick into high gear. But, similar to getting a blood test to determine what your body requires, you’ll need to first perform a soil test to determine the exact nourishment your lawn needs.
A soil test in the fall is an optimum time as the nutrients added will interact with the soil over the winter. If you do sample in the spring, try doing it early in the season to give your beds proper preparation before planting.
Lawns generally require a mixture of nitrogen, phosphorus, and potassium. (However, because of a 2013 Connecticut law, lawn fertilizers are phosphorus-free). This is referred to as the N-P-K ratio. For example, a fertilizer with a ratio of 25-0-25 contains 26% nitrogen, 0% phosphorus, and 25% potassium.
How to do a soil test:
- Dig into soil approximately 6 inches with a small shovel or spade
- Collect 15-20 samples from different areas
- Place in a small plastic — not metal — container
- Do not collect wet soil
- Drop off or send to your local extension center
Once you know what your soil needs, it’s time to fertilize.
Different types of fertilizer spreaders:
- Drop spreader
- Broadcast/rotary spreader
Drop spreader
- Narrow distribution area
- Used for small- to medium-sized lawns
- More expensive that rotary spreaders
Broadcast/rotary spreaders:
- Appropriate for larger yards
- Easy to use

7. Weed control
Drop that football and instead tackle those weeds with a pre-emergent herbicide to prevent a spring eruption. However, if weeds are still sprouting in the fall, you’ll need to hit them with a post-emergent herbicide.
Weeds come in many varieties, shapes and sizes. Some common ones you might encounter in Connecticut are:
- Dandelion
- Henbit
- Creeping Charlie
- Broadleaf plantain
- Nutsedge
- Prickly lettuce
- Crabgrass
Why weeds need to be controlled:
- Compete with “good plants” for space
- Prevent grass and other plants from thriving
- Might house unwanted insects
- Compete for water, sunlight, and other essential nutrients
When applying a herbicide, follow the instructions carefully and wear appropriate clothing for protection, such as long sleeves and pants.
If you are worried about exposure to chemical treatments, here are some organic remedies to suppress weeds:
- Green Gobbler Vinegar Weed and Grass Killer
- Natural Armor Weed & Grass Killer
- Doctor Kirchner Natural Weed Killer
Make your own weed killer:
- Mix ¼ cup of salt with a quart of white vinegar
- Add 2 teaspoons of dish soap
- Shake and spray
If you want to try the “hands on” remedy and pull the weeds out yourself, go for it! But, be sure to extricate the entire root system. This method might work with dandelions, depending on how many have popped up, but a herbicide application works more effectively.

8. Don’t stop watering
Despite that slight nip in the air, your lawn still requires hydration. A lawn well watered in the fall produces a healthy root system and verdant turf in the spring. Continue to water deeply, but infrequently, until the first freeze. During this time of the year, rather than rely on your sprinkler system with a set schedule, let your eyes program the watering timetable.
Signs your lawn needs watering:
- Clearly see your footprints after walking on the grass
- Lawn is a dull, bluish-gray color
- Leaf blades wilting
On the other hand, if you notice water flowing down your driveway and into the street, this is an indication that you’ve overwated.
Your lawn requires approximately 1 to 1 ½ inches of water weekly. If nature isn’t supplying enough, then you’ll need to supplement.
How to properly water:
- Water early in the morning, before 10 a.m.
- Early morning sun assists in drying off the grass
- Morning watering reduces disease
- Sun will evaporate water if you water later in the day
To test your sprinkler output:
- Place three small cans around the lawn; one near the sprinkler head, one in middle and another at end of the spray
- Run sprinklers for 15 minutes
- Measure amount of water in each can
- Add and divide by 3 to determine the average output
Another way to test your sprinkler output is the screwdriver test:
- Run sprinklers for 15 minutes
- If the screwdriver easily slides 6 inches into your soil, then 15 minutes is the proper amount of time to water

9. Shut down your sprinkler system
Once you are done watering for the season, and frost is on the way, it’s imperative to shut down your system completely. Water residue can freeze resulting in cracked pipes and broken sprinkler heads. Consequently, the entire system might rupture!
The three methods to winterize your sprinkler system are manual drain, automatic drain, and the blow-out method.
Manual drain:
- Shut off water access
- Drain water out of mainline
- Open test cocks on backflow device
- Make sure all water has been drained out
- Close all manual drain valves
Automatic drain:
- Shut off irrigation water supply
- Drain water
- Open drain valve
- Drain rest of water
- Turn on test cocks on backflow device
- Allow any excess water to drain
Blow-out:
- This winterization method is potentially hazardous, time-consuming, and requires great skill. Compressed air can result in serious personal injury. We highly recommend you call in a professional service.
However, if you decide to take on this project, here are the steps, but proceed with caution:
- Wear safety goggles
- Shut off water supply
- Connect air compressor to irrigation system
- Turn on sprinkler furthest from the compressor
- Close backflow valves to the irrigation system
- Open valve on the compressor
- Slowly add more pressure until water starts coming out of the sprinkler head you turned on
- Turn off sprinkler head when the water stops flowing
- Repeat process for each sprinkler head
- Release any air pressure left in the system once the water is drained
- Check and make sure all irrigation valves are closed

10. Winterize all lawn care equipment
Before any of your lawn and garden equipment settles in for a winter’s nap, they require a thorough cleaning, maintenance, and then storage. Responsible maintenance and winterizing prevents corrosion and improves performance.
Gas and battery-powered mowers:
- Wipe off any debris, clippings, and moisture
- Disconnect spark plug
- Drain the gas on gas model; remove battery on battery-powered model
- Replace oil
- Store in a dry place such as a garage or shed
Leaf blowers:
- Clean or replace the filter
- Disconnect spark plug
- Drain excess fuel, if applicable
- Clean carburetor
- Inspect straps for tears or wear
- Check hose for cracks
- If your model has a bag, empty it
Weed eaters/string trimmer:
- Wipe off any debris and wash with soap and water
- Clean and/or replace air filter
- Drain fuel
- Check string supply
Chainsaw:
- Drain fuel
- Remove chain
- Clean all dirt and grime
- Sharpen or replace the chain
- Oil chain and wrap in cloth
- Remove air breather and clean
- Remove spark plug
- Pour oil into spark plug opening
- Replace spark plug
- Clean air filter
- Tighten all screws and bolts
- Store in a clean, dry area and out of a child’s reach
By winterizing all your lawn care equipment, you can be sure it will be ready for spring.

11. Much ado about mulch
First of all, exactly what is this matter called mulch? It’s any material, organic or inorganic, applied on top of the soil that blooms with benefits, both aesthetically and health-wise for your garden.
Benefits of fall mulching:
- Stabilizes soil temperature
- Prevents repeated freezing and thawing
- Acts as an insulator through the cold New Haven winter
- Suppresses weed growth and erosion
- Assists in maintaining plant health
There are two main types of mulch: organic and inorganic.
Organic mulch is composed of natural materials such as shredded tree bark, grass clippings, sawdust, cocoa shells, hay, compost, and pine needles. As this type of mulch decomposes, your garden will reap the following benefits:
- Adds nutrients
- Less soil compaction and wind erosion
- Can release a pleasant odor, such as pine needle mulch
- Often inexpensive, such as straw
- Works well in vegetable gardens, around trees and shrubs
- Gives turf a healthy boost
Disadvantages to organic mulch:
- Requires regular maintenance
- Can contain weed seeds
- Might blow away when dry
- Decomposes quickly
Inorganic mulch includes stones, rocks, gravel, rubber, plastic sheeting, and landscape fabric.
Benefits of inorganic mulch:
- Low maintenance
- Decorative
- Stifles weed growth
- Stable; doesn’t blow away
Disadvantages of inorganic mulch:
- Not easily installed or removed
- Water penetration might be limited
- Not always as natural looking as organic mulch
- Doesn’t add any nutrients to the soil
A mulch “volcano” at the base of a tree provides an environment for unsavory creatures such as rodents and insects. Too much mulch provides a moist environment resulting in cracks in the bark. Insects take advantage of these cracks and cause damage to the bark. Rodents enjoy chomping on the tree bark, also causing damage.
How to mulch:
- Initially apply 2 to 4 inches around the base of the tree but maintain a 6-inch radius mulch-free ring from the tree base
- Annually apply 1 to 2 inches maximum

12. Prune and croon
It’s time to sing a lullaby to your garden and tuck it in for a long winter’s nap.
Follow these simple steps to winterize the garden:
- Trim any hanging branches that, when loaded with snow or ice, could result in damage to your home, car, or driveway
- Remove dead, diseased or damaged branches or limbs
- Divide perennials to allow more space for roots to develop
- Remove summer annuals to alleviate the chance of pests and disease
- Clean out weeds and dead flowers
- Stake and burlap wrap any plants or trees that require extra stabilizing against ice, snow, and wind

13. Clean the gutters
Gutters provide passageways for rain water to be redirected away from your home. Consequently, they reduce erosion of your soil and reduce the risk of basement flooding or foundation damage. However, they also can be a catch-all for leaves and other debris.
If left untreated in the winter, those clogged gutters will build up with frozen snow and could result in damage to your home.
Follow these steps to clean your gutters:
- Use a child’s sandbox shovel or gutter scoop
- Place a tarp down to protect the surface under the ladder
- Use a sturdy step ladder
- Dress properly: long sleeves, work pants, and water-proof gloves
- Attach a bucket with a ladder hook to avoid trips up and down
- After all the debris is removed, rinse the gutter using a long garden house with spray nozzle
- Repair or replace gutter fasteners, loose brackets, or rubber gaskets, if necessary
Pro Tip: Recruit a neighbor to steady the ladder or better yet, call a local professional gutter cleaning company. Balancing on a tall ladder, brandishing a hose might just be dangerous for a homeowner.

Fall ‘pro-to-call’
In the fall, there are tailgate parties abound in New Haven with both the University of New Haven and Yale University so close by. If football isn’t your passion, New Haven County oozes with haunted places. (But, “boo-aware,” the legendary Evergreen Cemetery is not for the faint-hearted),
However, fall lawn maintenance still needs to be done. If all that raking, mowing, aerating, dethatching, and fertilizing sounds overwhelming, call a Lawn Love lawn care and mowing service in New Haven. They can assist with some or all of the tasks, leaving you time to enjoy the leaves.
Main photo: manfredrichter | Pixabay