
Greenville is a city for nature lovers. If you want to get your own piece of nature looking its best before summer, check out these 12 spring lawn care tips.
Spring lawn care tips for your Greenville lawn:
- Test your soil
- Get your tools ready
- Perform a spring cleanup
- Sprinkler system startup
- Water wisely
- Dethatch
- Aerate
- Fertilize
- Overseed
- Control weeds
- Watch out for insects and disease
- Mow time
1. Test your soil
While you’re waiting for spring, you might as well take a soil sample. Testing your soil once per year is ideal, and it’s one of the simplest and best ways to keep your soil in top condition.
Caveat: Clemson recommends testing warm-season lawns (bermudagrass, centipedegrass, zoysiagrass) in late winter or early spring. Wait until June through August to test lawns with turf-type tall fescue.
Here’s how to take a soil sample from your lawn:
- Choose the area you’d like to sample.
If you fertilize your flower beds or garden differently from your lawn area, collect a separate sample for each area.
- Use a trowel or soil probe to collect 8 to 10 samples from the entire area. Take lawn samples at a 2- to 4-inch depth.
- Mix the samples in a plastic bucket. If the soil is wet, lay it out on a paper bag overnight to dry.
- Bring at least two cups of soil per sample to your Greenville County Extension office or put your sample in a prepaid mailer (available from the Clemson Lab).
- Expect results in one to two weeks.
Your soil test will provide the soil pH, nutrient levels (phosphorus, calcium, potassium, etc.), and recommendations on whether your lawn needs fertilizer or lime.
- You’re armed with information and ready to grow!
2. Get your tools ready

If you didn’t clean your tools in the fall, now’s the time. Here’s a quick guide to how to give a spring cleaning to your most frequently used tools.
- Take out your hand tools — hand clippers, loppers, shovel, trowel, hoe, etc.
- Remove extra dirt with a stiff brush or cloth.
- Dip them in a diluted bleach solution or spray with rubbing alcohol.
- Dry them with a clean cloth.
- Spray camellia oil on the metal (and wood) to prevent rusting.
If your tools are rusty, follow these simple tips to remove the rust and restore your tools:
- Remove all dirt and debris from the tool.
- Use a wire brush or steel wool to remove as much corrosion as possible.
- Continue to remove any remaining rust with coarse sandpaper.
- Use fine sandpaper if any rust remains.
- Give the tool a rinse and dry thoroughly.
- Apply mineral or camellia oil to prevent future rust.
Pro Tip: If you don’t have a dedicated storage place for your tools, now’s the time. Install a pegboard with hooks to hang your large and small lawn tools. Be sure your storage area has good air circulation.
3. Perform a spring cleanup
Now that your soil test is in the works and your tools are ready to go, it’s time to get started. There is nothing more refreshing after a long winter than a good spring cleanup.
- Pick up large sticks and fallen debris in the lawn.
While you’re picking up large limbs, see if there are other dead branches on the trees that need to come down.
- Remove dead, damaged, or dying stems.
Get out your hand pruners or loppers and remove all dead material from your perennials, shrubs, ornamental grasses, and trees.
- Use your blower to blow out old leaves and pruned material from underneath your bushes, trees, and flower beds.
- Use a mulching mower with the bag attached to mulch and collect all of the dead material you just blew onto the lawn. Add the mulched material to your compost pile.
Your spring lawn care is off to a great start!
4. Sprinkler system startup
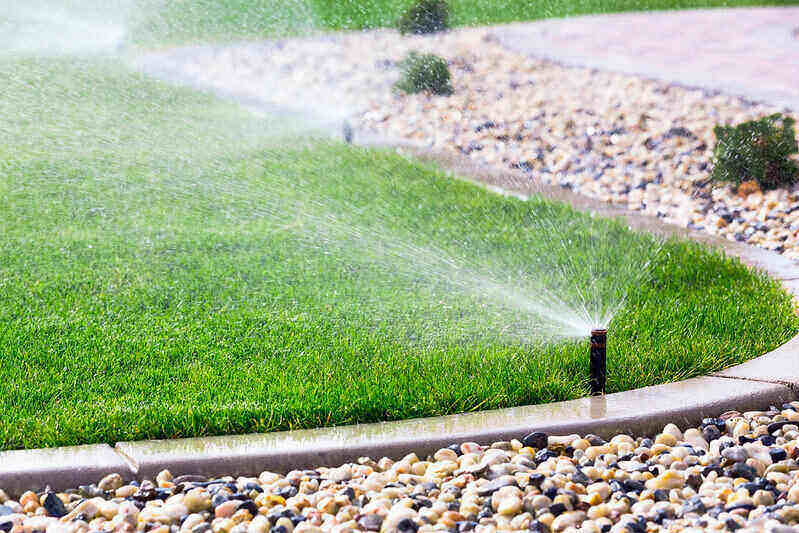
If you had your landscaping company winterize your sprinkler system, you’ll need to make another appointment for a spring startup. Get this appointment on the books early on. If you wait until it feels like spring, they’ll probably be booked.
Spring is an ideal time to do an irrigation audit. An irrigation audit (or tuna can test) measures how much water your sprinkler system puts out and where it lands on the lawn.
Remember, one inch of water per week is ideal in the late spring and summer. This can be from rain, your sprinklers, or both. Here’s how to determine how many minutes to run your sprinklers to get one inch per week:
- Grab tuna cans or plastic containers. Use at least five cans per zone.
- Run the sprinklers for five minutes.
- Do a little math.
Let’s say you’ve collected ¼ inch of water per can.
Divide the number one by .25.
Ex. 1/.25 = 4
Multiply your result by the number five.
Ex. 4 x 5 = 20
So, the answer, 20, is how many minutes you need to run your sprinklers to put one inch of water onto your lawn.
See how easy it is?
While you’re running the sprinklers, adjust them so water is not hitting the pavement. Also, make sure your cans are getting the same amount of water. If not, adjust the sprinklers so the water is evenly distributed.
If you see excess water running onto the pavement, set your system to run on intervals. This is usually a sign that the soil isn’t absorbing the water as fast as the sprinklers are supplying it.
5. Water wisely

Even if your sprinklers are set and ready to go, it doesn’t mean your lawn needs the water just yet. Experts at Clemson University advise homeowners to wait until the lawn shows signs of drought stress to turn on the sprinklers.
Here are a few techniques you can use:
- Watch for a color change
If your lawn turns a bluish-gray, it may be time to water.
- Footprint test
After you get home from work (or late afternoon), walk the lawn and see if you leave footprints. If so, the blades of grass have a low level of water in their tissues and can’t rebound from your weight.
- Leaf test
Look at the leaves. If the grass leaf is wilting, folding, or rolling, it’s time to water.
- Check the soil
Use a screwdriver and push it into the soil. If the screwdriver goes in easily, you probably have enough water in the soil. If the soil is very dry, the tool will be hard to push into the soil.
This test is helpful because sometimes low humidity combined with high temperatures and wind will make the grass look dry even though there is adequate moisture in the soil.
If you see that the grass needs water based on these tests, your sprinkler should be set and ready to go!
Final watering tips:
- If you have heavy clay soil, water may take a while to penetrate. Core aeration and topdressing with rich compost can help loosen clay soils and improve the rate at which they absorb water. If you have cool-season grass, aerate in the fall. Aerate warm-season grass in the summer.
- If you have dry spots in the lawn, but the rest of the lawn looks fine, only water the dry spots. This saves you money and avoids wasting water.
- Too much thatch makes a lawn more susceptible to drought stress. The general rule is to dethatch when the thatch layer gets above ½ inch. Core aeration will provide some dethatching but not as much as a thatching machine or hand-held thatching rake.
- Water early in the morning to prevent fungal issues.
6. Dethatch
Thatch is a layer of plant material that forms between the soil and grass. A little thatch is good, but too much thatch can invite insects and impedes nutrient, water, and pesticide absorption.
For warm-season grasses, dethatch as needed after green-up in the spring or early summer. Turf-type tall fescue and other cool-season grasses should be dethatched in late summer or fall.
| Grass type | When to dethatch |
| Bermudagrass | When levels exceed ½ inch |
| Centipedegrass | When levels exceed ¼ inch |
| Turf-type tall fescue | This grass does not develop significant levels of thatch. |
| Zoysiagrass | When levels exceed 1 inch |
7. Aerate
If you have heavy clay or compacted soil, your lawn may need to be aerated. Aeration opens up the pores of your lawn like a steam facial, allowing water, oxygen, and nutrients to cycle through and roots to grow strong.
| Grass type | When to aerate |
| Bermudagrass | Late spring, early summer |
| Centipedegrass | Late spring, early summer |
| Turf-type tall fescue | Fall |
| Zoysiagrass | Late spring, early summer |
8. Fertilize
Did you know that leaving the grass clippings on your lawn can reduce your need for nitrogen fertilizers? Yes, by mulching in your grass clippings, you reduce the amount of time and money you’ll spend on nitrogen throughout the year.
If you’re interested in fertilizing your lawn, this is often done at the same time you dethatch, aerate, and overseed.
Note: Always defer to your soil test. These recommendations assume the lawn needs more of a particular nutrient.
| Grass type | When to fertilize |
| Bermuda-grass | Add ½ to 1 pound of nitrogen per 1,000 square feet starting in May. Apply phosphorus if the soil test recommends it. |
| Centipede-grass | Don’t apply nitrogen or other nutrients until May or later. If nitrogen is needed, apply at ½ – 1 pound per 1,000 square feet in May. |
| Turf-type tall fescue | Best time is in the fall along with aeration and overseeding. Subsequent applications can be made up to March 15. |
| Zoysiagrass | Add ½ to 1 pound of nitrogen per 1,000 square feet starting in May. Apply phosphorus if the soil test recommends it. |
9. Overseed
Overseeding is planting new seed to fill in thin or bare spots in the lawn.
Overseeding is usually done at the same time you aerate and/or dethatch, meaning late spring or summer for warm-season grasses or fall for cool-season grasses.
| Grass type | When to overseed |
| Bermudagrass | May – Sod, plugs, and sprigs may offer a higher quality result than seed. |
| Centipedegrass | May |
| Turf-type tall fescue | Late September or October |
| Zoysiagrass | May – Sod is usually recommended because zoysia is notorious for its slow growth. |
10. Control weeds

Remember, the best defense against weeds is a healthy offense. In other words, master the basics of lawn care (mow, water, aerate, overseed), and you’ll prevent many weed problems before they start.
If you want to apply pre-emergents to bermudagrass, centipedegrass, tall fescue, or zoysiagrass, apply in mid-March and again eight to 10 weeks later. Look for the air temperature to hit 65-70 degrees Fahrenheit for at least four days in a row. When that happens, it’s time to apply.
If you miss this window of time before the weeds sprout and you see weeds starting to grow, consider a post-emergent. But wait until after the grass is done greening up to apply a post-emergent herbicide.
Pro Tip: If you are overseeding and using pre-emergents, time the overseeding to be at least eight weeks after you’ve applied the herbicide.
11. Watch out for insects and disease
Insect issues don’t appear until late spring (May or later). The most important thing to do is to be on the lookout for these issues as they arise. Contact a Greenville lawn care professional to help identify and deal with any issues early on.
| Grass type | Common spring insect issues |
| Bermuda-grass | Mole crickets may pop up in late spring but are primarily confined to coastal areas. Other insect problems don’t appear until May or later. Examples of possible insect issues (May or later): bermudagrass mites, bermudagrass scales, ground pearls, grubs, mole crickets, and nematodes. |
| Centipede-grass | Mole crickets may pop up in late spring but are primarily confined to coastal areas. Other insect problems don’t appear until May or later. Examples of possible insect issues (May or later): Ground pearls, grubs, mole crickets, nematodes, and spittlebugs. |
| Turf-type tall fescue | No insect issues from March through May. |
| Zoysiagrass | Mole crickets may pop up in late spring but are primarily confined to coastal areas. Other insect problems don’t appear until May or later. Examples of possible insect issues (May or later): Ground pearls, grubs, mole crickets, and nematodes. |
Most disease pressure for warm-season grasses is fungal and doesn’t present a problem until May or later.
| Grass type | Spring diseases |
| Bermudagrass | May or later – dollar spot, large patch, and spring dead spot |
| Centipedegrass | Large patch |
| Turf-type tall fescue | None |
| Zoysiagrass | Dollar spot and large patch |
Dollar spot – Dollar spot is a fungus caused by heavy dew on the grass. This fungus appears as yellowed, silver dollar-sized spots on the lawn. If you want to know when to expect dollar spot in your area, type in your ZIP code here and predict when it will hit.
How to prevent and treat dollar spot:
- Fertilize according to your soil test results
- Dethatch if needed
- Water deeply but infrequently to prevent drought stress
- Apply fungicides if needed
Large patch – This is another fungal disease that is especially common in centipedegrass and zoysiagrass during spring green-up. Look for large circular patterns of yellow grass.
Proper lawn management usually prevents or corrects large patch:
- Don’t over-apply nitrogen
- Don’t over-water
- Remove excess thatch
- Aerate if your soil has poor drainage
Spring dead spot – Spring dead spot can completely rot parts of your bermudagrass lawn. Look for white, bleached-looking spots in the lawn.
Prevention and treatment of spring dead spot:
- Correct any deficiencies according to your soil test.
- A pH from 5.8 to 6.2 is ideal.
- Maintain potassium levels on the high end of the recommended range.
- Dethatch in May if needed.
- Aerate yearly.
- Water infrequently and in the morning.
- Apply three fungicide treatments in October.
12. Mow time
Mowing is one of the best times to positively influence the health of your lawn. Properly mowing a lawn can help create a full, thick lawn and helps roots to grow deep, which reduces weeds and helps the grass withstand periods of drought.
If you haven’t already done a spring clean-up, bag the leaves as you mow if the leaf coverage is too heavy. If you only have light leaf coverage, use a mulching mower (without the bag) and leave the mulched bits of grass and leaves on the lawn.
| Grass type | Mowing height in spring |
| Bermudagrass | 1 inch |
| Centipedegrass | 1 inch |
| Turf-type tall fescue | 3 inches |
| Zoysiagrass | 1 ½ -2 inches |
Remember, these heights are for the first mowings in spring and are a little shorter than summer cutting heights in most cases. Check out the lawn calendars linked above for summer height recommendations.
Another simple tip: Use a sharp mower blade. Why does this matter as long as the grass gets cut, you ask? A dull mower blade tears the grass, which acts like a wound that makes the lawn more susceptible to disease. A sharp blade gives the grass a clean cut and allows it to heal quickly.
Pro Tip: Follow the One-Third Rule of Mowing: Don’t remove more than one-third of the grass blade per mow. This prevents excess stress on the lawn, which may cause the roots to stop growing and make the lawn less able to access water deep in the soil.
If you’d rather spend your time taking a trip to the Greenville Zoo or strolling on the Swamp Rabbit Trail, contact one of our Greenville lawn care pros today. They will take lawn care off of your weekend to-do list so you can spend your free time doing what matters most.
Main Photo Credit: Pixabay | Pexels