
Fall in Knoxville means scenic hikes in the Smokies and evenings around the bonfire — not spending your free time worrying if your lawn will make it through the season.
No need to fret: In just 10 steps, you’ll set your yard up for successful winter hibernation so it can emerge a lush, prize-winning lawn come springtime.
1. Keep your lawn hydrated
Even though temperatures are dropping, your lawn still needs water to stay strong and healthy through the rest of the year.
Knoxville is in the transition zone, meaning that both cool-season and warm-season grass types can thrive in this region, but each has different care requirements. Fall is the growing season for cool-season grasses, which means this is the most important time to keep cool-season grasses hydrated and growing.
Keeping a regular watering schedule throughout the season will help your grass establish sturdy roots just in time for winter. Be sure to keep weekly rainfall in mind while scheduling when to water your lawn — overwatering can lead to problems like disease, weeds, and thatch buildup.
It’s important to water your lawn deeply, which encourages the roots to grow deeper into the ground. Lawns typically require 1 to 1 ½ inches of water per week, and shouldn’t be watered after temperatures dip below 40 degrees.
Pro Tip: Water early in the morning (before 10 a.m.) so the plants have time to soak up the water before the sun starts baking. Avoid watering at night, as extra water left in the soil overnight can increase the risk of disease and pests.
2. Rake away the mess
While fall is a beautiful time to admire the changing leaves around Appalachia, it’s hard to admire them when they’re piling up in your yard. Rake once or twice a week, depending on the number of trees losing their leaves around your yard.
Why is raking important?
Removing leaves from your lawn is more than just for aesthetic reasons. Leaving dead leaves to decompose on your lawn can lead to issues for your grass, including:
- Thatch buildup
- Lack of light, nutrients, and oxygen, which will kill your grass
- Compact soil
- Increase in pests
- Fungus, mold, and lawn diseases
3. Keep mowing until it’s not growing
As temperatures drop, you might not need to mow your warm-season lawn as much. But how often should you be mowing your lawn?
Try to mow every four to seven days for cool-season grasses, or seven to 14 days for warm-season grass types, making sure not to chop off more than ⅓ of the grass at a time. Leave the grass clippings to add nutrients to your lawn, or collect and compost them.
When should I put the mower away?
When temperatures fall below 40 degrees, you can stop mowing and put the mower away for the winter. Once it reaches this temperature, your grass isn’t likely to grow anymore until the spring.
4. Dethatch, if needed
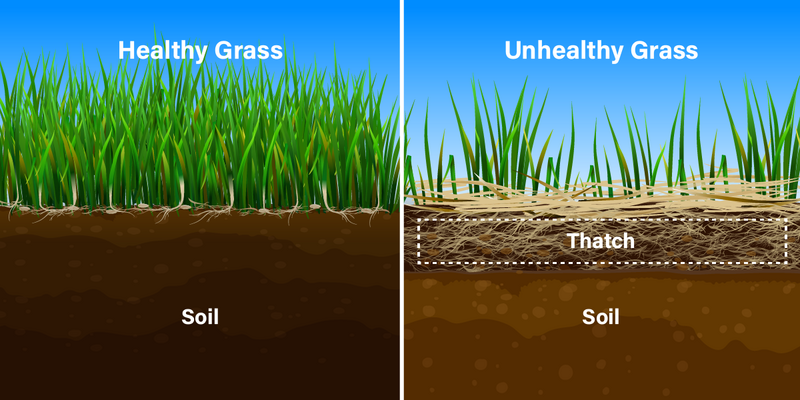
If you have a cool-season grass type, such as tall fescue or Kentucky bluegrass, you should consider dethatching your lawn at the end of the summer or beginning of fall. Thatch is a layer of debris that builds up in your lawn over time as new grass grows quicker than dead grass blades can decompose.
A little bit of thatch is fine, but thatch that’s greater than ½ inch thick will invite pests and disease to take over your lawn.
When should I dethatch my lawn?
It’s best to dethatch your lawn during your grass’s growing season — which is between late summer and early fall for cool-season grasses. If you have a warm-season grass type, wait until the spring to dethatch.
Luckily, cool-season grasses tend to develop thatch slower than warm-season types. If your yard builds up a lot of thatch, it might be a good idea to dethatch annually. Otherwise, you might be able to dethatch about every other year, or once the thatch reaches ½ inch thick or more.
How to dethatch your lawn:
If there’s not much thatch in your yard to begin with, you can try to use a regular rake to dig in and detangle it from your grass. If you have a deeper layer of thatch, it might be a good idea to get use a power rake (AKA verticutter or dethatcher), which is designed with vertical blades to easily get rid of excess thatch.
5. Aerate your cool-season lawn
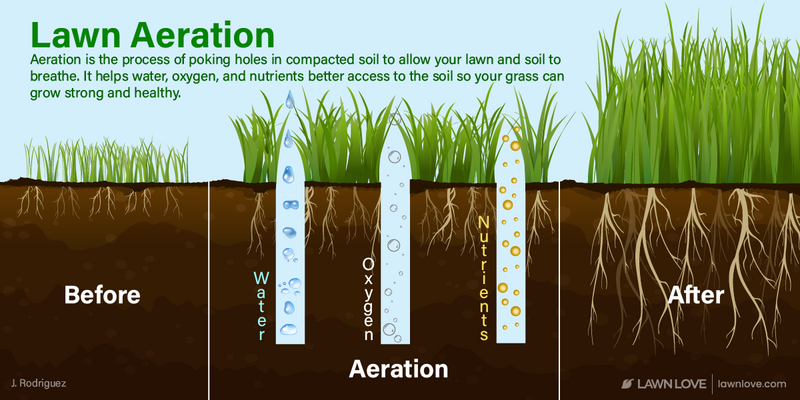
Aeration is another key task to help your lawn breathe better. If you have a cool-season grass, early fall is typically the best time to aerate your lawn.
Aeration is the process of creating small holes in your lawn (either with a rake or aerator) to help air, water, and nutrients pass through more easily. It’s also helpful to do before overseeding, giving your lawn the best potential for new growth.
Cool-season grasses can be aerated during the early fall or early spring. Warm-season grasses should be aerated at the beginning of summer. It’s best to plan to dethatch, aerate, and overseed around the same time because these processes work together to help your lawn grow abundantly.
Advantages of aerating:
- Boosts grass growth
- Allows more water and nutrients to seep into the soil
- Smooths out bumpy lawns
How to aerate your lawn:
The two primary forms of aeration are spiking and coring.
- Spiking: poking holes in the lawn with spikes
- Coring: removing plugs of soil from the lawn
Most experts recommend coring since the process allows for more room to breathe compared to spiking.
6. Overseed cool-season grasses
Since you live in the transition zone, it can be hard to keep your grass lush and green throughout the year. If your cool-season grass looks like it’s worn out and thinning, you can overseed your lawn in the fall. Overseeding is spreading new grass seed over your existing lawn.
If it looks like your lawn is covered in bald patches, check to make sure there aren’t any pesky pests or diseases to blame before overseeding.
When should I overseed my lawn?
- Cool-season grass types — like tall fescue, perennial ryegrass, creeping red fescue, and Kentucky bluegrass — should be planted between September and mid-October
- Warm-season grasses — such as buffalograss, bermudagrass, and centipedegrass — should be seeded between March and July.
7. Fertilize cool-season grasses
Fall is the best time to fertilize cool-season grasses because that’s their peak growing season, and when they can best utilize the nutrient boost. Fertilizing your cool-season grass in the fall helps the grass stay nice and sturdy throughout the winter.
But how do you know if you should fertilize your grass in the fall or wait until spring?
Every homeowner should get their soil tested annually, and use that information to decide when and how to fertilize the lawn. You can do a DIY soil test at home, or send a soil sample off to your local Cooperative Extension office to receive a more comprehensive soil analysis.
Your soil test will tell you whether or not your lawn could use some extra nutrients like nitrogen, phosphorus, and potassium.
Homeowners with cool-season grass types should fertilize their lawn in mid-late August or early November, the latter of which will help establish a strong spring lawn. If you have warm-season grass, wait until late spring to begin fertilizing.
Most grasses prefer being “fed” three times a year. This helps replace vital nutrients lost during storms and fortify your lawn during its growing season. For the lushest grass, follow a fertilization schedule like the following:
Cool-Season Grass (tall fescue, perennial ryegrass, creeping red fescue, and Kentucky bluegrass):
- First feeding – April
- Second feeding – September
- Third feeding – November
Warm-Season Grass (buffalograss, bermudagrass, and centipedegrass):
- First feeding – April
- Second feeding – June
- Third feeding – September
8. Get ahead of weeds
You can get ahead of the pesky broadleaf weeds that emerge in spring by taking action in fall. Apply a pre-emergent herbicide to your lawn in the fall, between August and November. This will help you get control over unwanted crabgrass, dandelions, and fireweed, that typically plague the region, in addition to other common weeds.
If you’re still dealing with leftover weeds from summer, you can treat them with a post-emergent herbicide between September and October.
9. Winterize your sprinkler system
It’s important to get your irrigation system ready for the cold temperatures of late fall and winter. Sprinklers are an investment you want to take good care of to prevent costly repairs in the future. Winterizing your sprinklers is fairly simple — you just need to make sure it’s drained of all water before the first freeze of the year, which is usually around mid-October.
How to drain your sprinkler system:
Be sure to read your user manual to find out the best draining option for your system. There are three main options when it comes to winterizing your sprinkler system: automatic drain, manual drain, and blowout.
Automatic drain
- Disconnect sprinklers or turn off the water supply.
- Let the sprinkler heads run for a few seconds.
- When the pressure drops to a certain level, the automatic drain feature will kick in and the sprinklers will drain themselves.
Manual drain
- Disconnect sprinklers or turn off the water supply.
- Open all of the pipe valves.
- Let the water run until the system is drained.
- Empty the backflow device.
Blowout
- Safety first: Toss on some protective goggles as a precautionary measure.
- Disconnect sprinklers or turn off the water supply.
- Assemble the coupler and compressor.
- Use the coupler to join the air compressor with the sprinkler pipes.
- Locate the sprinkler head that’s farthest from the compressor and close its backflow valves.
- Slowly open the compressor valve, gradually increasing the pressure until you see water come out of the sprinkler.
- Wait until the water stops flowing.
- Turn off the sprinkler head and repeat the process for each sprinkler head.
- Detach the compressor.
- Close all valves.
10. Bundle up your garden beds
Winter brings unexpected storms and occasional freezing temperatures. Luckily, you can prepare your plants for unpredictable winter weather conditions.
How to keep your plants warm and protected:
- Insulate garden beds by adding a layer of mulch around your plants.
- Bring container plants indoors (after carefully checking for bugs).
- Put your plants in raised beds.
- Cover your plants with hoop tunnels — temporary structures constructed from wire or pipes and fabric.
- Build cold frames over your plants. They act like miniature greenhouses and are a more permanent option compared to hoop tunnels.
Need a hand with checking off fall lawn care tasks? Contact a local lawn care professional to assist with all of your lawn care and landscaping needs.
Main Photo Credit: Pexels | Pixabay