| Key takeaways: |
|---|
| • Choose interlocking mulches like shredded bark over smooth chunks to prevent sliding. • Install edging, terracing, or jute netting to physically hold your mulch in place. • Rough up the soil and apply mulch in thin layers to stop runoff. • Plant groundcovers for the best long-term slope stability and erosion control. |

Mulch on slopes washes away because gravity, rain runoff, and wind constantly work to move it downhill. The solution is using the right mulch type, installing physical barriers like edging or terracing, and adding landscape netting or fabric to hold everything in place.
Without proper techniques, your mulch—and your investment—slides away after the first heavy rain. If you would rather skip the heavy lifting, Lawn Love’s local landscaping services handle everything from leveling to proper installation.
Best mulch types for slopes
Choosing the right material is important, as soil type dictates how mulch behaves.
Johannes Hock, president of Artificial Grass Pros in Austin, Texas, says, “Clay soils retain water and bloat,” creating a sliding mat after storms. To fix this, he uses lighter shredded hardwood that won’t sit heavy on a saturated surface.
In sandy soils, where drainage carries mulch away, Hock uses heavier interlocking bark. He also mixes in compost first, as “added organic matter gives mulch something to bind to.”
Best mulch type options:
- Shredded hardwood bark: Interlocks naturally, stays put better than chunks.
- Shredded cedar or cypress: Long-lasting and locks together tightly.
- Pine straw: Grips the slope and flexes with soil movement.
- Crushed stone/angular gravel: Jagged edges lock tightly in place.
- Arborist wood chips: Mixed sizes knit together securely; often available from local tree services.
Avoid:
- Bark nuggets or rounded chips: Smooth shapes easily roll downhill.
- Fine mulch or loose straw: Too lightweight; washes or blows away.
- Rubber mulch: Tends to slide unless secured by strong edging.
- River rock or pea gravel: Smooth stones shift and roll away easily.
Note: For slopes steeper than 33% grade, use erosion control methods beyond your standard mulch application.
Read more:
Step-by-step: Mulching on a slope
1. Calculate your slope steepness
Calculating your slope prevents yard washouts and home flooding.
What you’ll need: 2 stakes (or sticks), a piece of string (at least 10 feet long), a tape measure, and a string level.
- Set your stakes: Hammer one stake at the top of the hill and one at the bottom.
- Level your string: Tie the string to the top stake at ground level, pull tight, and level it before tying it to the bottom stake.
- Measure:
- The run: The length of the string between the two stakes.
- The rise: The distance from the string down to the ground at the bottom stake.
- How to calculate: Divide the rise by the run, then multiply by 100 to get your slope percentage.
Example: A slope that rises 1 foot over 4 feet horizontal = 25% grade (1÷4 = 0.25 × 100 = 25%)
Here’s what your slope percentage means for mulching:
- Gentle (under 20%): Standard mulch and simple edging work fine.
- Moderate (20%-33%): Use “long-fiber” mulch, netting, or boulders to stop sliding.
- Steep (over 33%): Use terrace walls, deep-rooted plants, or erosion blankets.
2. Prepare the soil properly
Proper soil preparation keeps your mulch from sliding.
Taylor Olberding, franchise owner at Heroes Lawn Care in Austin, TX, says, “Laying mulch over smooth, compacted soil is a common mistake. When the ground is hard, water runs off instead of soaking in and can wash the mulch down.”
Pro tip: “Before mulching a slope, I like to rough up the soil surface,” Olberding advises. He also suggests cutting “small horizontal grooves or shallow trenches to slow water down, giving the mulch something to ‘grab onto’.”
Easy steps to prep your soil:
- Pull up any weeds, large rocks, or debris.
- Use a hard metal rake to scratch and loosen the top inch or two of soil so it isn’t a smooth, hard crust.
- On steeper slopes, dig shallow, horizontal lines across the incline to act as speed bumps for rainwater.
- Even out the soil, but be careful not to pack or stomp it back down.
Note: “Never spread mulch right over spots where runoff already cuts through,” warns Hock. Standard mulch washes away in heavy currents, so leave natural drainage channels bare or line them with river rock.
Read more: 14 Ways To Manage Stormwater Runoff
3. Install edging at the top and bottom
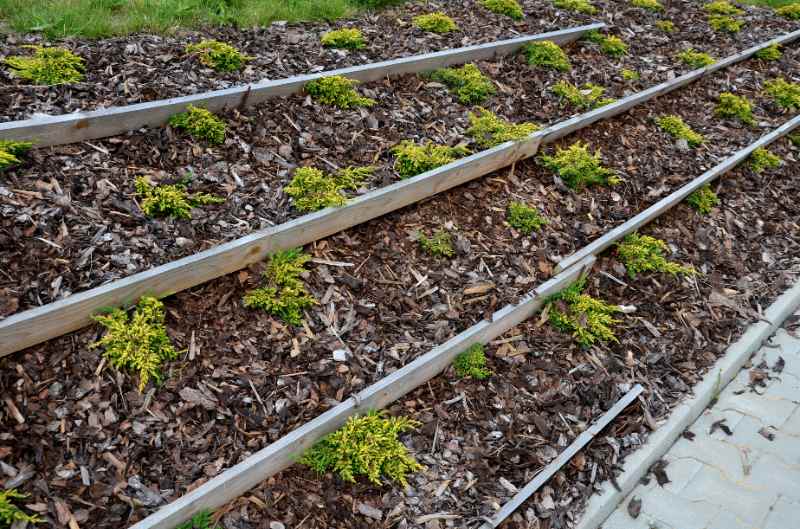
Edging acts like a small “dam” that holds mulch in place so it doesn’t slide or wash downhill during heavy rain.
As Olberding notes, “small terraces, edging, or even logs placed across the slope can break up water flow,” which helps slow runoff before it picks up and carries mulch away.
Install barriers at both the top and bottom of your slope—the bottom piece matters most because it catches mulch that slides downhill, and the top edging helps define the bed.
Options include:
- Plastic or metal landscape edging: Use these for curved beds or creating clean, nearly invisible borders.
- Landscape timbers or railroad ties: Ideal for straight lines, rustic styles, and building small, sturdy terraced retaining steps.
- Natural stone borders: Choose these heavy options for a natural look that easily withstands heavy rain.
- Paver edges: Ideal for matching brick patios while providing a neat, durable, and formal appearance.
Basic install depth (works for many yards): Push edging 4-6 inches into the ground with 2-4 inches above ground to create a physical barrier.
Read more:
3. Use landscape fabric or jute netting
You must use landscape fabric or jute netting to stabilize sloped yards, anchor new plants, and stop soil erosion. Avoid slick plastic weed barriers, as they guarantee mulch washes away.
“Jute netting is what we end up doing for most of our slope installs,” Hock says. ”It holds mulch down flat against the grade and decomposes naturally in about 12 to 18 months.”
By that time, plant root systems secure the soil.
For erosion-prone slopes, lay landscape fabric or biodegradable jute netting before mulching:
- Roll out fabric or netting over the entire slope.
- Overlap edges by 6 inches.
- Secure with landscape staples every 12–24 inches, tighter where runoff is fastest.
- Cut small “X” openings only where you’ll plant.
- Apply 2-3 inches of mulch on top.
Pro tip: For major trouble spots, Hock recommends stapling down a layer of jute mesh every 8 to 10 inches and covering it with a coarse mulch. He says this heavier texture “allows finer material to lock underneath and create a reset of the whole bed without starting from scratch.”
4. Terrace the slope
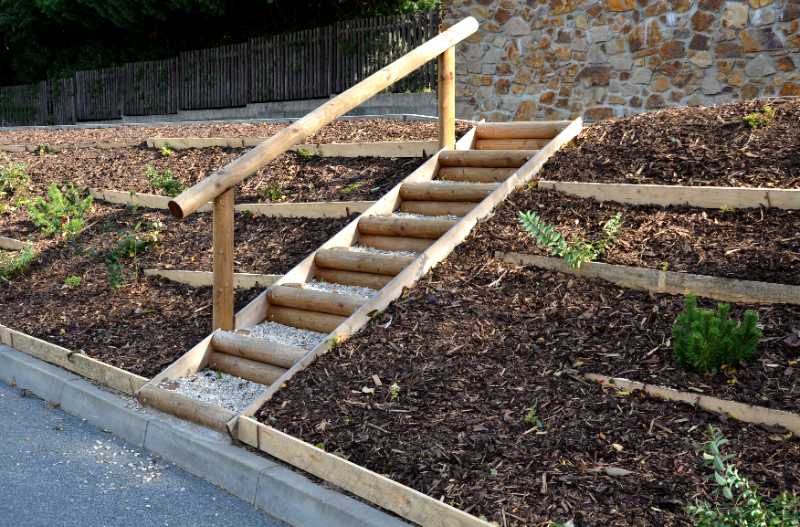
Steeper yards need level steps—often called terracing or “benching”—to slow down rushing water.
While it costs more upfront, Hock notes that it saves on the cost of mulch. From a long-term spend standpoint, he explains, you no longer have to replace washed-out mulch every season.
For moderate to steep slopes, create level sections using landscape timbers, logs, or stone:
- Install barriers horizontally across the slope every 3-6 feet.
- These act as mini-dams that catch and hold mulch.
- They also slow water runoff that would otherwise wash mulch away.
5. Apply mulch in thin layers
A thick, dry mass has no cohesion and will slump under its own weight. Target 2-3 inches total depth—enough for weed suppression without excessive weight that slides downhill.
“Piling it too thick is an issue I get a lot. Past 3 inches, root systems have a hard time anchoring into the ground below,” Hock warns.
Application mulch steps:
- Apply a 1-inch layer first.
- Water the surface lightly to help the pieces settle.
- Add a second 1-inch layer on top and water the area again.
- Water thoroughly to lock everything together.
*Note: Make sure you leave an air gap. Pull the material back 1 or 2 inches away from plant stems and tree trunks to prevent soft bark and rot.
Read more: How to Keep Mulch in Place
6. Use mulch stabilizers
Liquid stabilizers act like an invisible glue, bonding mulch into a protective crust. Olberding recommends using them strictly on gentle slopes with minimal erosion, noting that manual barriers are much more reliable for steeper grades.
Hock agrees, noting that the protective bond doesn’t last long. In his experience:
“After 2 or 3 hard rains, the binding agent breaks down, and you are back to square one,” he says.
Note: If you decide to try one, apply the spray according to product directions right after laying your mulch. Some formulations require misting with water to activate the bonding.
7. Plant groundcovers for long-term stability

Organic covers alone cannot permanently hold a steep yard.
“Planting groundcover helps long term because the roots hold the soil and keep everything from shifting,” Olberding explains.
Best groundcovers for slopes:
- Fragrant sumac ‘Gro-Low’
- Ostrich fern
- Dwarf lobed coreopsis
- Creeping phlox
- Green-and-gold
- Switchgrass
- Wild strawberry
- Yarrow
What to do: Set the root ball of the plant so it is level with the upper side of the hillside. Mound soil on the lower side to cover the remainder of the roots. Once established, these plants form a living matrix that reduces your need for added materials.
Read more:
Alternative solutions for very steep slopes
If mulch repeatedly washes away despite your best efforts, consider the following alternatives:
- River rock or gravel: Heavier than organic mulch, stays in place. Use landscape fabric underneath.
- Erosion control blankets: Biodegradable blankets (coconut fiber, straw, or jute) that hold soil in place while new plants take root. It can be used alone or with light mulch on top.
- Retaining walls: Eliminates the slope entirely by creating level planting areas, though it’s a bigger investment.
- Native plantings: Deep-rooted grasses, shrubs, and trees naturally control erosion with minimal mulch.
Maintenance for sloped mulch
Heavy storms will inevitably dislodge small amounts of material over time. Regular inspections ensure your retention systems remain intact and continue to catch falling soil and debris.
- After heavy rains: Rake mulch back up the slope to redistribute what’s washed down.
- Spring and fall: Add a thin top layer (1 inch) to replace decomposed or migrated mulch.
- Inspect edging: Ensure barriers remain intact and are still containing mulch.
Cost considerations
On gentle hills, a basic mulch job is an easy way to keep your landscaping costs down. But for steeper slopes, you’ll likely need professional planning and heavy equipment.
- Basic slope mulching with edging: $200 to $400 per 100 square feet
- Terracing with timbers plus mulch: $500 to $1,000 per 100 square feet
- Erosion blanket plus mulch: $300 to $600 per 100 square feet
- Retaining walls: $40 to $345 per linear foot (or $4,000 to $34,500 for a 100-foot wall).
Read more:
- How Much Does Mulch Cost in 2026?
- How Much Does Land Grading Cost in 2026?
- How Much Does Landscape Curbing Cost in 2026?
Call in a landscape pro
Successfully mulching slopes requires interlocking mulch types (shredded bark or pine straw), physical barriers (edging and terracing), and often landscape netting for added stability.
If your approach fails or you have higher slopes, call in a pro. From simple weed control, lawn mowing, and edging to building complex terraces, Lawn Love’s local pros have you covered.
Main Image: A person spreading fresh mulch on a slope. Image Credit: Michal / Adobe Stock
Related Posts:


