
Does a stroll along The Public Garden make you green with envy?
The grass in your Boston lawn can be just as luxurious, you just need to put a little time and preparation into your fall lawn care routine. This is especially important in the fall when your grass is growing and needs extra care to be healthy and survive Boston’s tough winters.
In just 11 steps, you can follow our fall lawn care checklist to get your lawn looking great to match New England’s beautiful autumnal views.
- 1. Rake away the leaves
- 2. Mow until it doesn’t grow
- 3. Don’t stop watering
- 4. Dig out the thatch
- 5. Aerate after dethatching
- 6. Fortify with fertilizer
- 7. Overseed your lawn
- 8. Wave goodbye to weeds
- 9. Winterize your mower
- 10. Winterize your sprinkler system
- 11. Tuck your landscape in for the winter
- Fall in love with your lawn
1. Rake away the leaves
Trees are stunning in the fall, changing the landscape from summery green to yellow, orange, and red. But the leaves don’t look so pretty when they’re piling up in your yard. Depending on how many trees are shedding around your lawn, you may want to rake up to twice weekly.
Why should I rake?
Raking does more than make your lawn look tidy. If leaves pile up in your yard, it can lead to:
- Increased pests
- Risk of lawn diseases
- Potential for fungus or mold growth
- Preventing light, water, and nutrients from reaching your grass
- Greater chance of thatch buildup
2. Mow until it doesn’t grow
As it begins to get chilly outside, you may want to stop mowing your lawn. Cool-season grasses grow and thrive in the crisp fall weather, so it will need to be maintained until it stops growing in late October or early November.
How often should I mow?
For cool-season grasses, it’s best to mow every four to seven days in the fall. Be careful to never cut more than one-third of the grass during a mowing session. Most grass types do well at a height between 2-3 inches.
When should I stop mowing in Boston?
After temperatures dip below 40 degrees Fahrenheit, your grass will stop growing. When you get closer to the winter season and it’s regularly below 40 degrees, you can finally put your lawn mower and other equipment away until spring.
It’s imperative to mow your grass at the proper height to prevent pests and diseases. As the temperature drops, you can let your grass grow a bit longer to stay fortified for the winter.
Most Boston homeowners have a cool-season grass type like Kentucky bluegrass, perennial ryegrass, fine fescue, and tall fescue, and some even have a warm-season grass type like Zoysiagrass.
| Grass type | Ideal grass height |
| Kentucky bluegrass | 2.5 – 3.5 inches |
| Perennial ryegrass | 1.5 – 2.5 inches |
| Fine fescue | 2.5 – 3 inches |
| Zoysiagrass | 1 – 2 inches |
| Tall fescue | 3 – 4 inches |
3. Don’t stop watering
The sun might not be beating down on your lawn like it was over the summer, but your grass still needs water to keep growing and stay healthy.
How often should I water my lawn?
How much you should water your lawn depends on your grass and soil type, but most grasses can benefit from being watered 1-1.5 inches per week. Make sure to water early in the day (before 10 a.m.) to give your lawn time to soak it in and enjoy.
When should I stop watering my lawn in Boston?
Once the temperature has dropped below 40 degrees Fahrenheit, your lawn is basically in hibernation mode for the winter, and there’s no need to water again until the spring.
4. Dig out the thatch
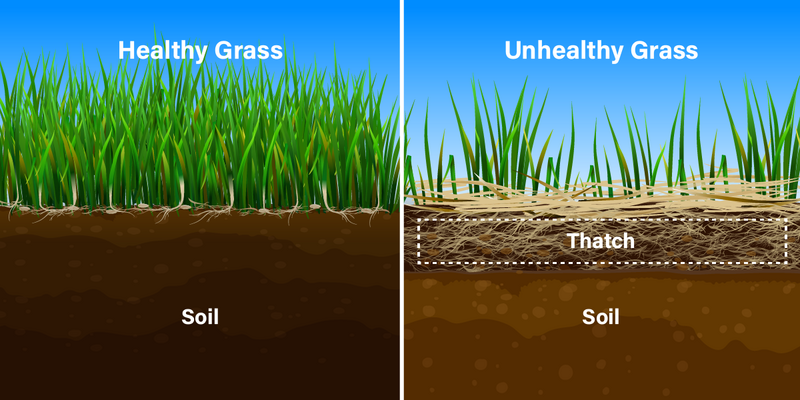
What is thatch?
Thatch is a layer of debris that builds up in your lawn over time. Thatch is made up of organic plant material (like roots and leaves) that has accumulated between the soil and the growing grass.
You can feel if your lawn has some thatch buildup if you walk on the grass and the ground feels spongy. Cool-season grasses should be dethatched at the end of summer or the beginning of fall.
Why should you dethatch?
It’s good to have a small amount of thatch, but once it’s larger than a half-inch thick, it’s time to break out the dethatcher.
High levels of thatch can lead to:
- Suffocated plant and grass roots
- Increased problems with pests and fungus
- Reduced levels of air, water, and nutrients reaching the soil
How to dethatch:
You can try to dig the thatch out with a regular rake, but if that doesn’t do the trick, you might want to rent a more powerful tool. A deep layer of thatch can be removed with a dethatcher (AKA power rake or verticutter). They kind of look like lawn mowers, but with a vertical blade to dig deep into the ground.
5. Aerate after dethatching
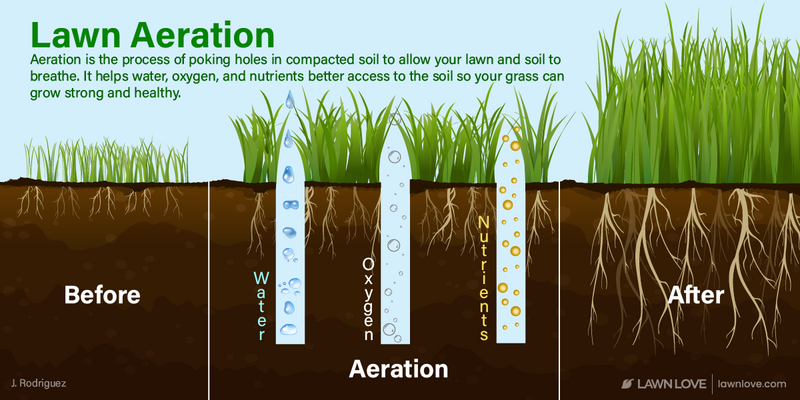
It’s a good idea to aerate your lawn soon after dethatching since both tasks will work together to help your lawn breathe. Early fall is usually the ideal time to get your lawn aerated.
What is aeration?
Aeration is a process that helps air, water, and nutrients pass through to the soil more efficiently. Doing this before overseeding sets you up for a flourishing lawn for the fall.
How to aerate?
There are a few options when it comes to aerating. You can use a rake or a spike aerator to get the job done by poking holes into the ground, or you can use a core aerator to remove plugs of soil from the ground.
These techniques are known as coring and spiking. Experts prefer coring since it makes a bigger impact on your lawn compared to spiking.
Advantages of aerating:
- Helps water and nutrients directly pass through into the soil
- Enhance new grass growth
- Can help smooth out bumpy lawns
6. Fortify with fertilizer
Cool-season grasses grow abundantly during the fall, which is when they need that extra boost of fertilizer to stay green and healthy through the season. Supplying your lawn with vital nutrients before the winter helps your grass handle the harsh weather conditions.
How do I know which nutrients my lawn needs?
Conduct a DIY soil test, or get a more comprehensive one done at your local Cooperative Extension office. You can send them a soil sample and you’ll receive a more detailed soil analysis.
Once you’ve received the results of the soil test, you can see which nutrients your lawn might need, especially nitrogen, phosphorus, and potassium.
In Boston, potassium is a very important element in your lawn fertilizer. Potassium helps protect your lawn against disease and improve its resistance to the cold.
When should I fertilize my lawn?
The best time to fertilize cool-season grass types is mid-late August or the first couple of weeks in November.
You can feed your grass once per year in the fall or spread it out to three smaller applications a year to replenish nutrients that were used up or lost due to storms. This also will help keep your lawn going strong during its growing season.
If you use multiple fertilizer applications for cool-season grass types, aim for the following fertilization schedule:
- May — first feeding
- August — second feeding
- November — third feeding
7. Overseed your lawn
Overseeding is when you spread extra grass seed over your existing lawn to fill in bare patches and add extra volume to your thinning grass. Make sure there aren’t any pests or diseases to blame for the bare patches before overseeding.
When to overseed:
The best time to overseed your lawn in Boston is between mid-August and mid-September. This is when there are optimal environmental conditions for new seeds to sprout. Overseeding after dethatching and aerating will yield the best results.
8. Wave goodbye to weeds
By establishing a strong, healthy lawn, you hopefully won’t have to worry too much about weeds. But sometimes weeds pop through despite following the most diligent lawn care routine. If weeds are a constant nuisance in your yard, especially during the fall and winter, you’ll want to apply a pre-emergent herbicide to your lawn between August and November.
If your lawn is still battling broadleaf weeds from the summer, apply a post-emergent herbicide sometime between September and October.
Pro Tip: Avoid adding pre-emergents soon after aerating, fertilizing, or overseeding. Doing this might make the herbicide less effective. As a rule of thumb, you should wait a few weeks and mow new grass at least three times before applying pre-emergents.
9. Winterize your mower
The last thing you need is to break out the mower in spring to discover that it needs expensive repairs because it wasn’t properly stored throughout the winter.
Don’t let it happen to you. Take care to winterize your mower after your last mow of the year to prevent weather-related damage. Be sure to consult your user manual for guidance, since different models have different requirements.
Typically for gas-powered mowers, you’ll want to drain the gas or add fuel stabilizer. For electric mowers, just remove the battery and store it somewhere where the temperature is consistently above 40 degrees Fahrenheit.
While you’re winterizing your mower, you should check to see if there is anything that needs to be replaced or repaired, like the spark plugs, air filter, or fuel filter.
10. Winterize your sprinkler system
Boston winters are freezing, so you must prepare your irrigation system for the cold temperatures to prevent expensive pipe damage.
Thankfully, it’s not difficult to winterize your sprinklers. To prevent damage, you just need to drain the sprinkler system of all water before it gets too cold. In Boston, you should winterize your sprinkler system before the first freeze of the year, which is typically before early November.
How to drain your irrigation system:
There are three primary ways to drain your sprinkler system. Consult your user manual to find out which is best for your system. Your three options are automatic drain, manual drain, and blowout.
Automatic sprinkler drain
- Disconnect the sprinklers or shut off the water supply.
- Wait while the sprinkler heads run for a couple of seconds.
- Once the pressure reaches a certain level, the automatic sprinkler drain function will begin and the sprinklers will then drain themselves.
Manual sprinkler drain
- Disconnect the sprinklers or shut off the water supply.
- Open each pipe valve.
- Wait until the water has run out and the entire system is empty.
- Empty the sprinkler’s backflow device.
Sprinkler system blowout
- Use safety goggles to protect your eyes.
- Disconnect the sprinklers or shut off the water supply.
- Put the coupler and compressor together.
- Using the coupler, join the air compressor and sprinkler pipes together.
- Find which sprinkler head is farthest from the compressor.
- Close the sprinkler’s backflow valves.
- Cautiously open the compressor valve, increasing the pressure slowly until you can see water come out of the sprinkler.
- Let the water flow out.
- Turn off the sprinkler head.
- Repeat this process for every sprinkler head.
- Detach the compressor.
- Close all sprinkler valves.
11. Tuck your landscape in for the winter
Boston winters can blow in plenty of snow, and sometimes even brutal blizzards. Make sure your plants are ready for the frostiest time of the year with a little preparation in the fall.
Protect your plants by:
- Adding a layer of mulch around them as insulation
- Planting them in raised beds
- Covering them with hoop tunnels — protective structures made out of fabric and wire or pipes
- Covering them with cold frames — small structures that work like little greenhouses
- Bring container plants inside or onto a covered porch
Fall in love with your lawn
Take care of your landscape so you can enjoy late fall nights on your lawn around the fire without worrying about any unsightly patches of dead grass or piles of leaves. Lawn care doesn’t need to be daunting: start prepping your tasks near the end of the summer, and getting your lawn ready for winter will be a breeze.
Want your lawn to look like Harvard Yard, but don’t have the time for lawn care? Reach out to a local Lawn Love pro for all of your lawn care and landscaping needs.
Main Photo Credit: John Ames | Flickr | CC BY-ND 2.0