
After about 25 hours of use, your lawn mower’s blades will be too dull for optimum performance and will need sharpening. Dull lawn mower blades can cause uneven cuts, grass damage, and increased fuel use, so knowing how to sharpen lawn mower blades is one of the most important parts of owning a mower. This step-by-step guide will teach you exactly why, when, and how to keep those blades sharp and your lawn looking crisp.
How to sharpen your lawn mower blades: Step-by-step guide
Here is a step-by-step guide to sharpening your lawn mower blades that any homeowner can follow. You should perform these steps at least every 25 hours of use, but you may need to do them more often if you have a large yard or thick grass. Learn about the signs that your lawn mower blades need sharpening below.
Step 1: Gather tools
Before you get started, make sure you have all the tools you’ll need to sharpen your mower’s blades effectively, including:
- Wrench
- Rag
- Screwdriver
- WD-40 lubricant
- Eye protection
- Mask
- Penetrating cleaner
- Work gloves
- Hand file or grinder
- Bench clamp or vise
Step 2: Turn off the lawn mower and disconnect spark plug
Before you begin, ensure your safety by turning off the lawn mower and disconnecting the spark plug wire to avoid any accidental starts. Safety should always be the priority when dealing with maintenance or repair work on power equipment – especially when you’re dealing with blades that spin at around 3,000 rpm.
Step 3: Clean the mower
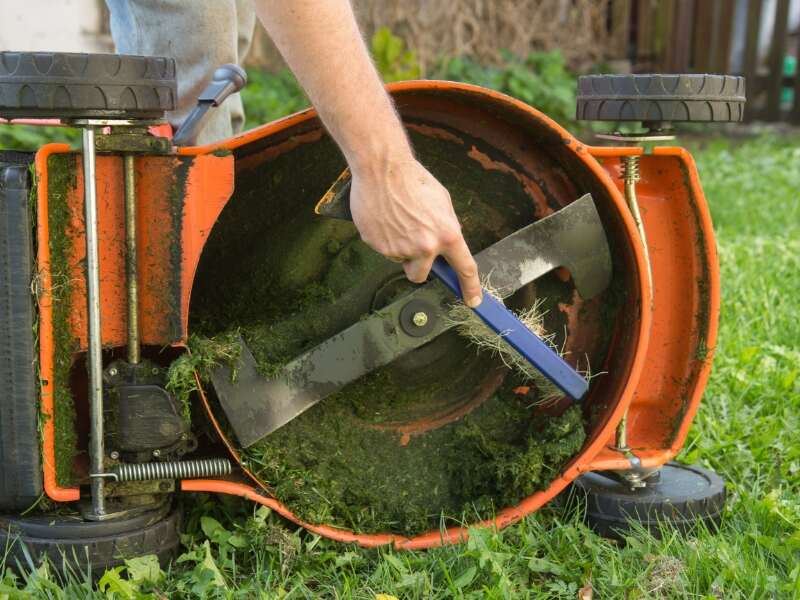
With the mower safely turned off, it’s time to clean it carefully. Find the blades, which are located on the underside of the deck. Grass clippings, dirt, and moisture accumulate here over time, which can cause rust and corrosion.
To begin, position the lawn mower on a level and flat surface. If your mower is small and lightweight, gently tilt it onto its side, ensuring the carburetor side is facing up to prevent fuel leakage. However, larger and heavier mowers may require a mower lift or blocks to raise the machine.
Once the mower has been elevated or tilted, inspect the underside and remove any clumps of grass, mud, or debris using a brush or putty knife. A clean surface will make working on the blades easier and prevent debris from interfering with the sharpening process. See our guide on “How to Clean the Underside of a Lawn Mower” to learn more about this step.
Step 4: Remove the blades
Once the mower’s underside is clean, you’re ready to remove the blades. Don’t worry; it’s not difficult. Begin by locating the blade retention mechanism, which usually consists of either a single bolt or a series of nuts that secure the blades to the mower deck. Take a wrench or socket set that fits the fasteners snugly and carefully loosen them.
Pro Tip: Some mowers have more than one blade, so keep track of the orientation of each blade as you remove it. Taking a quick photo with your phone or drawing a simple diagram can be helpful for when you reattach the blades later.
After properly separating the blade or blades from the mower deck, place them on a level surface for closer inspection. This is your opportunity to examine the blades’ condition and assess the maintenance level required.
Step 5: Examine the blades for damage

Closely inspect the mower blades for signs of damage or wear. Look for nicks, cracks, bends, or significant dents on the cutting edge. You should replace the blades if you see any damage other than little dings. In addition, place the blades on a nail or screwdriver shaft to examine their balance. If one side tips more than the other, you must balance the blades after sharpening to ensure an even cut.
Step 6: Select the best sharpening method
After you’ve performed the critical check of your lawn mower blades, it’s time to get down to business – sharpening! There are different strategies to consider, each with benefits and drawbacks. Let’s take a look at the two main sharpening methods: hand sharpening and bench grinding.
Hand sharpening with a file or whetstone
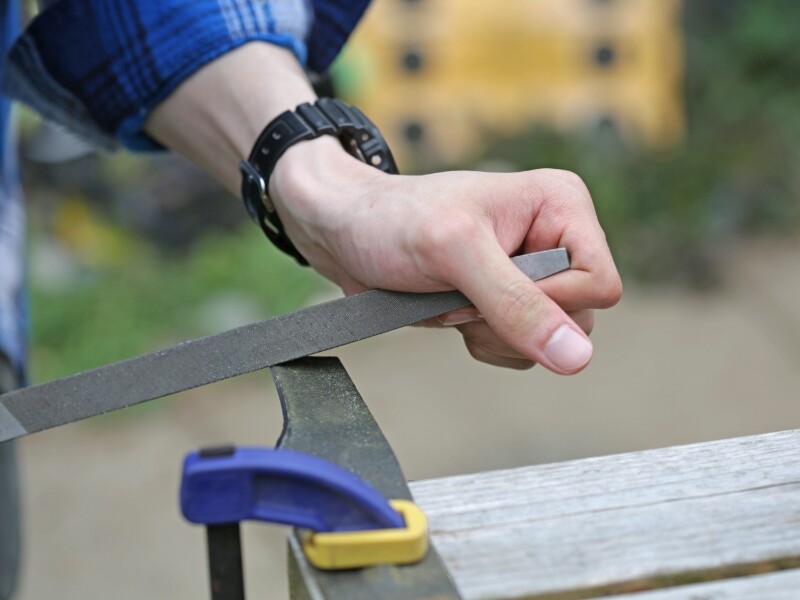
This method employs a handheld file or whetstone. It is ideal for beginners and those who want a more hands-on approach. It gives you more control and precision during sharpening, making it easier to fix tiny nicks and defects.
You’ll need a flat file or a sharpening stone to sharpen the blades and a vise to hold them in place.
Place the blade in the vise to keep it stable while you work on the cutting edge. Begin by aligning the file or whetstone with the bevel of the blade. The bevel is the angled side of the blade (aka the “beveled” side) that does the cutting.
Follow the existing angle of the blade (usually a 40- or 45-degree angle) with smooth and regular strokes along the cutting edge. Be careful to avoid too much pressure, as smooth, controlled strokes produce the best results.
Usually, blades require around 50 strokes to get sharp enough, like a butter knife. Avoid overdoing it because razor-sharp blades get dull quickly.
Bench grinding

A bench grinder is a powerful and efficient tool for sharpening lawn mower blades. This method is best suited for those with expertise, as it needs a steady hand and careful control to avoid overheating and ruining the blade’s temper.
To get started, position the blade carefully against the revolving wheel of the grinder, keeping the blade’s original angle in mind. Move the blade steadily across the grinder to ensure uniform and consistent sharpening. It is critical to regularly immerse the blade in water during the operation to prevent overheating, which might weaken the blade’s structure.
Note: Take the required safety precautions and use protective gear, such as goggles and gloves, if you operate a bench grinder yourself.
Regardless of your approach, maintaining a consistent angle and avoiding excessive material removal are critical factors for optimal sharpening.
Step 7: Balance the blades
After successfully sharpening your lawn mower blades, ensure they are precisely balanced before reinstalling them. Blade balance is essential for creating a smooth and uniform cut over your lawn, eliminating needless stress on the mower’s motor and preventing excessive wear and tear.
Checking the balance of the blades is a simple procedure. Position the blade so the center hole rests on a nail or screwdriver shaft to check the balance. Observe how the blade settles. If one side tips down more than the other, there is an imbalance that must be corrected.
Don’t worry if you discover an imbalance; it’s a regular occurrence, especially after sharpening. To fix unbalanced blades, you have a couple of options:
— Option 1: Softly file or grind down the blade’s heavier side. Take care during this process, as removing too much material can result in an imbalance in the opposite direction.
— Option 2: Add weight to the blade’s lighter side. You can buy specialized blade balancers or make your own by connecting small washers or nuts to the blade’s lighter side until it balances evenly.
Make your improvements as precisely as you can, taking off or adding just a little bit of weight at a time. Keep checking the balance throughout the operation until the blade rests evenly on the balancing point.
Step 8: Reinstall the blades
Now that your lawn mower blades are sharp and balanced, it’s time to put everything back together and reinstall them on your mower. Begin by carefully repositioning each blade on the mower deck, aligning them correctly according to your previous notes, picture, or diagram. Accuracy is critical since faulty installation can lead to an uneven cut and mower damage.
Once the blades are in place, tighten them down using the necessary screws. Again, don’t overdo it. Overtightening can harm the screws’ threads and the mower deck.
Check all connections to make sure there are no loose parts or potential risks that could create problems during operation. When you’re sure everything is placed correctly and securely, reconnect the spark plug wire to the spark plug.
Step 9: Mow your lawn and check your work
During the first mow after sharpening the blades, listen for any strange noises and beware of excessive vibrations. Check the grass to make sure the cut is clean and straight. If you notice any issues, repeat the steps above to make sure your blades are sharp enough and attached correctly to the mower.
Note: Routine maintenance, including regularly sharpening the blades, changing the engine oil, and cleaning the air filter, will improve your lawn mower’s performance and extend its lifespan. For in-depth knowledge about all the care your mower needs, follow our “DIY Lawn Mower Maintenance Guide.”
Signs your lawn mower blades need sharpening
A keen eye for detail can make or break your well-kept lawn. Watch out for the signs below, which indicate your mower blades are dull and in need of sharpening:
- An uneven and unkempt appearance after mowing
- Stray spots of tall grass or unevenly cut areas
- A noticeable decrease in cutting efficiency
- Strange sounds like a high-pitched whine or vibrating while mowing
- Torn or shredded grass clippings
Awareness of these indicators will allow you to address blade maintenance immediately, resulting in a healthier and more beautiful lawn. Even if you don’t notice these signs, best practice is to sharpen your mower’s blades after every 25 hours of use.
The importance of sharpening lawn mower blades
Picture this: You’ve spent hours precisely mowing your grass, trying to produce those straight, magazine-perfect lines every lawn enthusiast strives for. Instead of the pleasing, clean-cut appearance you desired, you’re left with a lawn that appears uneven and ragged. What could have gone wrong?
The most likely cause is worn-out lawn mower blades. Sharp blades are the ultimate secret weapon for growing a pristine, healthy lawn. Let’s look at why it’s so important to keep your mower blades sharp:
— Cleaner and Healthier Cuts: Sharp blades cut grass cleanly and efficiently. This clean cut encourages faster healing and lowers the danger of common lawn diseases and pests infiltrating your lawn via damaged grass blades. A cleaner cut also leads to a more polished and visually appealing lawn.
— Improved Lawn Health: Evenly cut grass can absorb more sunshine, making it thicker and healthier. A torn or ragged cut, on the other hand, strains the grass and makes it more sensitive to drought and other environmental stressors.
— Increased Fuel Efficiency: Dull blades make the lawn mower’s engine work harder to cut through the grass. As a result, your mower burns more gasoline, increasing operating expenses and negatively impacting the environment. Even if you have an electric mower, dull blades will hurt its efficiency.
— Time-Saving: Sharpened blades cut through the grass quickly, saving you time and energy. You’ll finish the chore faster, giving you more time to enjoy your well-kept yard.
— Cost-Effective: Sharpening your lawn mower blades on a regular basis extends their lifespan and reduces the need for blade replacements. In the long term, this saves you money, making blade maintenance cost-effective.
FAQ about sharpening mower blades
Can I sharpen bent or damaged blades?
Sharpening badly broken or bent blades is not recommended. Replace them instead to maintain the safety and effectiveness of your lawn mower.
Can I reuse old blades that have been sharpened several times?
Sharpening eliminates some of the blade material, causing it to thin and weaken over time. While you can sharpen blades multiple times, they will eventually need to be changed to retain ideal mowing performance. Depending on the quality and size of your blades, you may be able to sharpen them anywhere from five to 10 times before they need replacing.
How do I keep my blades from becoming dull so quickly?
Avoid hitting hard items like rocks, tree stumps, and curbs while mowing to keep your blades from dulling quickly. Keeping your lawn free of dirt and cleaning the mower deck regularly will also help to decrease blade wear. Furthermore, altering the cutting height for your grass type helps save stress on the blades.
Final thoughts
Although you might know how to sharpen lawn mower blades, that doesn’t mean you want to spend your time doing it. That’s what pros are for! Lawn Love can connect you with lawn care pros in your area so you can set up routine mowing and other services, such as lawn fertilization and weed control. With a trusted professional taking care of your lawn, you can forget about lawn and mower maintenance for good.
Main Photo Credit: welcomia | Canva Pro | License