
A perfectly striped lawn is the goal of every lawn aficionado. Whether you want your lawn to look like a professional sports field or simply want to alter your mowing patterns once in a while, lawn striping is something you can easily do by following some simple steps. Batter up, and let’s dive right into how to stripe your lawn.
What is lawn striping?
Even if you’re not a sports fan, you’ve probably seen striped patterns on golf courses, outfields, or the lawn next door. So, what is lawn striping? The process involves bending the blades of grass in one direction or another with a lawn mower that has a roller attachment at the back. This piece is cylindrical in shape and can be made of metal or plastic.
As sunlight hits your lawn, grass blades bent toward you will appear darker, while grass blades bent away from you will look lighter, creating a noticeable pattern.
Why should you stripe your lawn?
It turns out that mowing your lawn in different directions does a lot more than just increase curb appeal (which it does quite well). In fact, the way you cut your grass can make or break your lawn. Alternating mowing patterns will:
- Keep your grass healthy, thick, and vibrant by promoting strong roots.
- Prevent soil compaction, resulting in optimal root access to air, water, and nutrients.
- Stop ruts (track marks) from forming all over your lawn.
- Hide imperfections in your grass, whether it’s a brown patch, uneven soil, or weeds.
So before you mow your lawn next time, pay extra attention to how you’re actually going about it. Alternate the direction you push your lawn mower, and you’ll see healthier, more vibrant grass your neighbors will surely envy.
How to stripe your lawn

Here’s what you need to do to achieve a showstopper lawn:
Get your tools ready
If you have cool-season grass, you’ve got it easy. The rear skirt on your mower may be enough to leave your lawn with some impressive stripes due to the high flexibility of cool-season grass blades. However, keep in mind that striping without a roller won’t provide the same noticeable results.
If you have warm-season grass, you may need to up your game. Warm-season grasses are stiffer and bend less easily than their cool-season cousins. For defined stripes, purchase an add-on kit that contains a heavy plastic or metal roller (if yours doesn’t already have this attachment). Attach it to the back of your mower and start striping.
Add-on rollers can be purchased online or at any local home improvement store. Some options to consider include:
- Timati Lawn Roller
- Murray Roller for Lawn Mowers
- Brinly Combination Push/Tow Poly Lawn Roller
- AESRAOU Lawn Roller
Another option is using a push broom to create stripes. If you already have a push broom, use it to push the grass blades down in one direction and another, turning 180 degrees when reaching the end of each row. Repeat the process until the entire surface area has been covered. Go over your lawn a few times if you want a more noticeable pattern. Check out these broom options:
Prepare your lawn
For perfect striping results, your lawn must be in perfect condition. This means:
- Regular fertilization for strong, healthy grass growth.
- Weed or moss treatments to prevent unplanned growth among your grass blades.
- Occasional core aeration for proper nutrient absorption.
A lush lawn will stripe like a dream, which means you’ll have to spend less time and effort doing it.
Choose a lawn striping pattern
If you want to stripe your lawn, your imagination is your only limit. Pros advise starting small. For your first mow, master mowing in a straight line. Once you’ve got that down, try a checkerboard pattern, and so on. Here are a few popular patterns to get your creative juices flowing.
- Checkerboard – Achieved by mowing horizontal and vertical lines across the lawn. A second set of lines is then mowed perpendicular to the first.
- Diamond – This is done by starting with a first set of lines, then following up with a second set diagonally from one end to the other.
- Bulls-eye (circular) – Start from the outer perimeter of the lawn and create a circle in one direction. Move to the inside and go in the other direction, following the line of the existing circle. Create alternating light and dark circles until a bulls-eye pattern is visible.
- Wavy – Mow around the perimeter first, then form a wavy line down the middle. Use it as a base for subsequent waves. It’s easier if you form looser waves.
- Zigzag – This is one of the most time-consuming patterns homeowners can choose. Start out with a checkerboard or diamond pattern. Once this base layout is in place, you mow across one of the light stripes in the center of the base design, then move across to an intersecting dark one. Carefully turn the mower 90 degrees and select a light one again, followed by a dark one, and so on.
Don’t expect to mow a pristine lawn on your first try. It will take practice to gain this skill. Straight patterns are the easiest to master, so start there. Once you graduate to bulls-eyes, waves, and zig-zags, you’re officially in the major leagues.
Know your line of sight
Where will you most often view your lawn? Plan your design to run parallel to this vantage point for the eye-catching results you want. A design that runs perpendicular to your most common line of sight won’t be as noticeable.
Start mowing
You’re ready to mow once you’ve chosen your pattern and line of sight. Here’s how to do it:
- Mow around the perimeter (striper attachment optional).
- Start mowing along a straight surface if you’re a novice. Following a curb, driveway, or walkway will help make your first stripe a straight one.
- Turn the mower around and mow in the opposite direction. Make your turns in the perimeter area to avoid bending your striped grass in the wrong direction. Repeat until the entire lawn is complete.
- Once you’ve finished mowing, turn off your mower, and push it along your stripes again to intensify them with the attached roller.
Final tips:
- Alternate your pattern weekly or every other week, as we’ve discussed. You don’t want the blades to be permanently trained in only one direction. Even if you don’t stripe your lawn, alternating your mowing patterns will ensure a beautiful lawn.
- Got a riding mower? Not a problem. If it doesn’t come with a striping kit, you can purchase one.
- A sharp mower blade will give your lawn a clean, sharp-looking cut without any tears.
- Avoid striping or mowing wet grass, as this will mat or damage it.
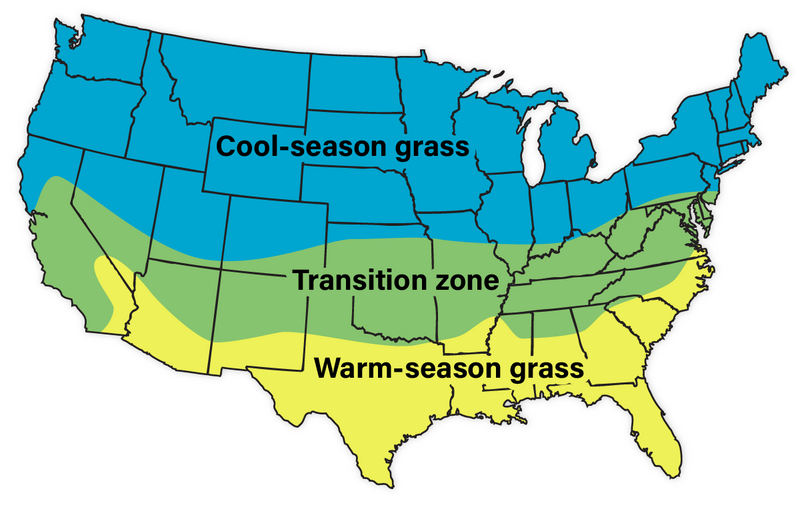
Which grass types are best for lawn stripes?
If you live in the northern part of the country, you probably have cool-season grass. Many lawns in the northern Transition Zone also have cool-season grass. These grass blades bend more easily and produce a better striping effect. Since the blades are more malleable than most warm-season grasses, you can get good striping results with the rear skirt of a regular push mower.
Warm-season grasses have stiffer blades and require more heft to get that professional look you’re after. You’ll want to buy a professional striping kit and attach it to the back of your mower for an eye-catching result.
If you’re not sure which type of grass you have, check out these characteristics for each:
Warm-season grasses
- Thrive when temperatures are between 80 to 95 degrees Fahrenheit.
- Grow best in the southern half of the U.S.
- Begin their active growing season in the spring and go dormant in early to mid-fall.
- Are drought and heat-tolerant and intolerant of cold and frost.
Cool-season grasses
- Thrive when temperatures are between 60 to 75 degrees Fahrenheit.
- Tolerate cooler temperatures but go dormant after the first frost until spring.
- Begin their active growth seasons in early spring and again in early fall.
- May require more fertilizer and pesticides than warm-season grasses.
- Maintain their green color all summer and winter in many transition zone locations.
Below is also a list of common grass types for each category. Both cool- and warm-season grasses grow in the Transition Zone.
| Grass Category | Grass Types |
| Cool-season | Tall fescue Fine fescue Kentucky bluegrass Perennial ryegrass |
| Warm-season | Zoysiagrass Centipedegrass St. Augustinegrass Bermudagrass Bahiagrass |
Factors to consider before striping
Not all lawns will achieve that optimal, professionally done look. The reason depends on several factors, including:
- Lawn height – A shorter lawn won’t stripe as well as a longer one. A taller mowing height (the high side of your lawn’s recommended range) means the blades won’t be as stiff and will have more surface area to bend. Our table below provides helpful information on mowing heights for different grass types.
| Grass Name | Grass Type | Suggested Mowing Height |
| Fine fescue* | Cool season | 2.5 to 3 inches |
| Tall Fescue | Cool season | 3 to 4 inches |
| Kentucky bluegrass | Cool season | 2.5 to 3.5 inches |
| Perennial ryegrass | Cool season | 1.5 to 2.5 inches |
| Zoysiagrass | Warm season | 1 to 2 inches |
| Centipedegrass | Warm season | 1 to 2 inches |
| St. Augustinegrass | Warm season | 2 to 3 inches |
| Bermudagrass | Warm season | 1 to 2 inches |
| Bahiagrass | Warm season | 3 to 4 inches |
*Fine fescues that grow in shady areas can be mowed up to 1 inch taller than the recommended range. Greater surface area helps shaded grasses make more food.
- Lawn density – A thicker lawn yields better stripes than a thinner one. For professional-looking results, start out with a carpet-like lawn.
- Grass type – As mentioned, cool-season grasses stripe better (and with fewer tools) than warm-season ones. Do your research on the time and effort you’ll need to spend striping your particular type of grass.
- Seasonal differences – This is another important aspect to consider. Think about raising the height of your grass by half an inch during the hot summer months.
If your lawn isn’t quite on par, we’re here to help. Browse through these articles to help get your lawn fuller and more lush.
- Guide to Lawn Fertilization
- How to Deal with Overgrown Weeds
- 4 Steps to Overseed a Lawn
- Lawn Mowing Tips and Tricks
FAQ about lawn striping
How can I fix a mistake?
If you go off-course while you’re mowing, don’t sweat it. Let’s say you veer right into the lane you’ve just completed while you’re trying to swat a mosquito. Re-cut the previous row and your current row to fix the mistake.
Will my lawn look like a professional sports turf when I’m done?
Your lawn will look slightly different from a baseball field or other professional turf for one simple reason: It will be taller. Professional groundskeepers mow sports turfs as short as one-eighth of an inch. Most homeowners want a more noticeable striping effect, which is why a taller mow is best for residential lawns.
How do I stripe my lawn around an obstacle?
Let’s assume you want your stripes to remain in a straight line across the driveway or on both sides of a swing set. Keep your eye straight ahead as you mow, about 10 feet in front of you. This will help you to maintain a straight line as you go across the obstacle and resume mowing on the other side.
Leave lawn striping to the pros
A striped lawn will simply look better than an unstriped one. If you suffer from a serious case of ballpark envy and want some stripes of your own, contact one of our local lawn care pros. They know just how to fertilize, mow, and stripe the lawn to make it ready for the big leagues, freeing up some time for you to sit outside and enjoy.
Main Photo Credit: AdamKR | Flickr | CC BY-SA 2.0