
Hydroseeding is a cost-effective and time-saving method of seeding your lawn with new grass. Also referred to as hydromulching or hydraulic mulch seeding, it is a spray-and-go solution for a new lawn. We’ll discuss the pros, cons, and how-to’s of this method in this article.
What is hydroseeding?
Hydroseeding is simply applying a slurry mix of grass seed, dye, mulch, water, and fertilizers to your lawn. If you are looking to establish a new lawn or start from scratch, it can be a cost-effective option. Most homeowners hire a lawn care company to do this for them, but if you have a large enough area, you can DIY and save money on labor.

Hydroseeding vs. other methods
If you are looking to apply grass seed to your lawn, you can seed, hydroseed, or sod. There are pros and cons to each method.
Hydroseeding is the preferred method in areas where you are battling soil erosion. It gets high marks for its fast installation time and cost-effectiveness for larger areas.
Pros
✓ Cheaper than sod
✓ Great for erosion control on steep slopes
✓ Germinates faster than seed
✓ You can DIY
✓ Not on a strict timetable as with sod
✓ Most cost-effective for large spaces
✓ Results are even, not patchy
✓ Mix prevents weed growth
✓ Very fast installation
Cons
✗ Costs more than seeding
✗ Not as instant as sod
✗ DIY requires heavy equipment
✗ Less savings on a smaller property
✗ Requires intensive watering for over a month
✗ Have to keep kids and pets off the lawn until seed is established
Hydroseed in fall or spring
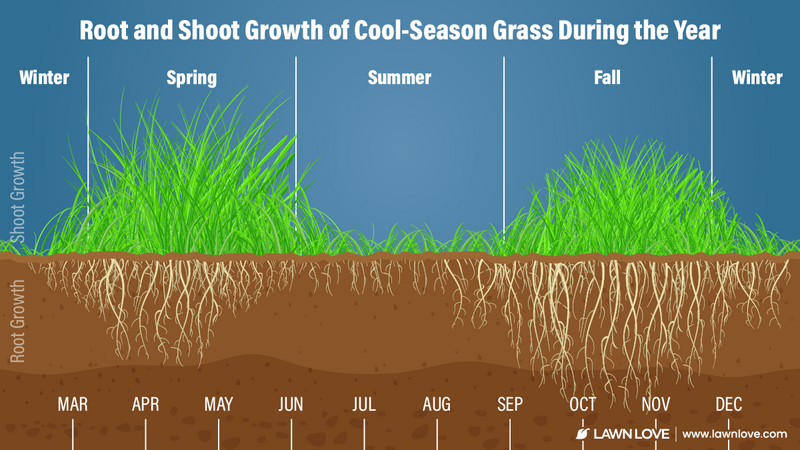
When is the best time to hydroseed? The generic answer is fall or spring, but this will depend on whether you have cool- or warm-season grass in your yard. In general, late summer and early fall are optimal for cool-season grasses. Warm-season grasses tend to be planted in late spring or early summer.

Hydroseeding costs
Renting a hydroseeder costs between $250-$300 per day. Then you’ll need to add in the costs of the materials based on the square footage of your lawn.
If you hire a professional, the costs range from 6 cents to 15 cents per square foot.
How to hydroseed your lawn in 9 simple steps
DIY hydroseeding is not a job for a novice. If you are familiar with heavy equipment and used to maintaining your lawn, then you should have the tools you need for the job. Here’s how to hydroseed your lawn in nine easy steps.
1. Get a soil test
You can get an at-home soil test or send off your soil sample to your state lab through your local Extension Office. You’ll need this information to determine which fertilizers to mix into the hydroseed slurry.
2. Measure the lawn area
Use a measuring wheel or online tool to calculate the square footage of your lawn.
3. Gather materials and equipment
If you are renting a hydroseeding machine, find a supplier near you. Purchase the grass seed you want to spread, mulch, lime (as needed), tackifier, and fertilizer. (Tackifier is used when hydroseeding on steep slopes or when the slurry could be eroded by an irrigation system. It is a glue that binds the slurry to the soil.)
4. Mark the sprinkler heads with flags
This helps to prevent damage to the sprinkler heads while you’re using heavy equipment.
5. Clear the area
Remove all grass and weeds with a sod cutter or power rake machine. Hydroseeding can only be done on a bare lawn.
6. Prepare the hydroseeding site
Grade the soil a few inches below your desired final height. Add a few inches of compost and topsoil, depending on your soil’s needs. If your lawn has poor or compacted soil, you will need to till in organic matter as part of your soil preparation work. Re-grade the site so you have an even surface.
7. Make your hydroseeding slurry
Mix the water, seed, mulch, tackifier, lime (if using), and fertilizer into your rented auger machine and let mix until fully combined.
The consistency will vary depending on the materials you’ve chosen and the terrain (sloping vs. flat). Some say not quite as thick as a milkshake (sloped terrain), but others use a much thinner consistency (flat land). Your supplier should be able to help you determine the right consistency based on the products you’re mixing and your terrain.
8. Hydroseed your lawn
Spray the hydroseeding mixture onto the area of your yard where you want to grow grass. Don’t work your way into a corner. Plan your path so you won’t walk on freshly sprayed ground.
9. Water your new grass seed
Run your sprinkler system three times per day for 15 minutes or less as a general rule. The goal is to keep the soil consistently moist, but not muddy. After the first month to six weeks, you can water slightly less.
How to care for your hydroseeded lawn in 4 simple steps
1. Stay off the grass
Keep little feet (pets and kids) off the grass for two to three months.
2. Give the seeds time to germinate
How long does it take grass to grow? This depends on the grass seed and weather. In general, expect germination in 5-21 days, depending on weather conditions. It can take up to eight weeks “to see strong growth.”
Here is a chart that lists normal germination times for standard seeding (when you use a spreader to put down seed and fertilizer). Since hydroseeding the lawn results in faster germination, you can expect to shave a few days off these times, at least on the high end of the ranges.
| Grass Type | Germination Time |
| Bermudagrass | 10-30 days |
| Centipedegrass | 10-28 days |
| Fine fescues | 7-14 days |
| Kentucky bluegrass | 14-30 days |
| Perennial ryegrass | 5-10 days |
| Tall fescue | 7-12 days |
3. Wait a month to mow
When can you mow your new grass? The short answer is that you can plan to mow the new grass after about a month OR after the grass reaches 3-4 inches tall. Make sure the grass is dry and your blades are sharp before you mow. Also, follow the one-third rule and never cut more than one-third of the blade at a time.
4. Fertilize your new grass
Even though your slurry has fertilizer built-in, you will need to start your new lawn on a fertilization program. When to start this will depend on your grass and the time of year you hydroseed. Check out our article “When (and How) to Fertilize your Lawn” for detailed information. If you are interested in organic fertilizers, read about “How to Grow Chemical-Free Grass.”
Hydroseeding: From solid dirt to a beautiful lawn
Hydroseeding is a great alternative to seeding and sodding for some homeowners. Here’s why: Hydroseeding is cost-effective for larger lawns and provides a full, consistent result.
Whether you hydroseed your yard yourself or hire a landscaping or lawn care pro near you, remember to seed at the right time of year, perform a soil test, prepare the site, and water, water, water. If you (or a pro) follow these steps, you’ll have a full, plush lawn in just a few months.
Main Photo Credit: Projar | Wikimedia Commons | CC BY-SA 3.0